Pages

Showing posts with label Stamping. Show all posts

Friday, 27 September 2013

Beautiful butterflies


I was hit with crafters block this week when it came to planning next weeks classes - I had started working with one idea, but it just didn't come together the way I wanted. So I sat staring at the cat for inspiration - no joy, just communicated a telepathic message to him to jump up on my desk!

So I went back to my notebooks - ever since I started crafting I've kept notebooks with sketches, ideas & techniques I've seen & want to try - nowadays they'd be called something fancy like a smash book lol! But mine are tatty old spiral notebooks with scribbles & drawings & lots of arrows & notations :-)

Anyhoo - this was an idea inspired by something I saw on tv a year or so back. The butterflies are stamped in a circle. The outer border is stamped, then a circle of butterflies created by stamping & cutting out scraps of beautiful papers. 

Sorry for the waffle! I'm linking this to Pixies Snippets workshop, cos snippets were used!

Thanks for stopping by

Debs x

Thursday, 26 September 2013

Men's cards - hubby birthday!

I couldn't decide what sort of card to make Hubby this year so..........I made 3!!

One for his love of music, using some inchies stamps and music embossing folder 


One to reflect his love of clocks - the little wooden embellishments I've been saving for nearly a year! 


And one cos he loves his car, and driving - used an old scrunched page out of a Haynes manual - complete with oily finger prints lol! Used a twisted stacker topper of a Mustang, some metal bookplates to frame words, and some wheel trim & screw head brads. 


I had a lot of fun making these, hope they give you some ideas for men's cards!

Thanks for stopping by

Debs x


Monday, 24 June 2013

Seashells

I had a snippet of my embossed water droplets card left, and was racking my brains how to use it. Then I remembered this lovely sea shells set from Crafty individuals! And an off cut of 'wavy' paper from a First Edition pad.


You can just about see the droplets behind the seahorses. The original plan was to have just the seahorses, but then I decided to add a few seashells, so raided the white card snippets, stamped, coloured & cut out. 

Then I decided that I needed a second panel with a verse, and then more seashells!  Then I decided they needed to be glazed with Glossy Accents. So what was to be a quick snippets make ended up taking most of an afternoon lol!

Linking this to Pixies Snippets playground cos I used a ton of snippets!

Thanks for stopping by

Debs x

Thursday, 28 March 2013

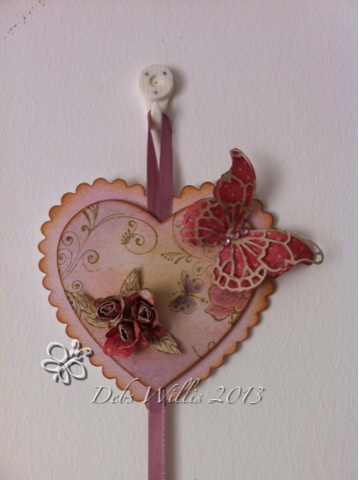
Hearts and flowers - vintage look wall hanging

This is the finished wall hanging made with hearts, some of you saw the experimental phase on my desk yesterday!

I couldn't achieve the effect I wanted with the acrylic paints, so went back to my trusty Distress Inks! really pleased with the finished effect, made with a Memory Box Butterfly die cut, some punched shapes & rolled rosebuds from K& Co McKenna papers, stamped with a mix of stamps from WOW, Creative Expressions and Dimension Stamps....

this is the full monty, hanging on my wall, and below are close up pics .....


Planning to teach this at a future workshop, should be great fun!

Thanks for stopping by

Debs x


Tuesday, 19 March 2013

Happy Tuesday!

Had a lovely weekend in London at the O2 arena. Andy's Xmas pressie was a
Pair of tickets to a country music weekend festival - had a great time but Monday was a washout cos I was exhausted!

Bit more with it today and hit up the orange snippets folder in a big way! Just seemed like the right sort of colours for spring :-)


Used snippets of orange spots & stripes papers - no clue where they were from originally. And snippets of white card for my topper & die cut flourish & punched butterflies - have so many of these cut off pieces of white card, and they're perfect for these little die cuts!

The stamp is a Penny Black one that I love, coloured with Pro Markers - so entering this in the following challenges:
Penny black Saturday challenge
Pixies Playground Snippets
Pro Marker Challenge 
Forever Friends Challenge - flowers

Off to sort the washing :-)

Debs x

Tuesday, 12 March 2013

Tissue box covers

This is what I have planned for classes today and tomorrow. Tissue box covers, tailored to your own colour scheme & design!

The basic box is incredibly quick & easy to make from 2 sheets of A4 - I deconstructed a tissue box to make the template. And all the decoration is using Inkylicious Ink Dusters and stamps - plus a few punched shapes!

Thanks for stopping by

Debs x

Wednesday, 27 February 2013

WOYWW

Happy WOYWW fellow snoopers :-). This is my desk todayIt's grey & cold here & I'm a bit lacking in enthusiasm today. Will visit some of your desks to gain some inspiration!


My desk looks fairly tidy (for me!!) On the left you can see an A4 box crammed with stuff in need of sorting - I made a new rule that if box was full I had to sort it - so instead I piled on top& stacked underneath - lol!!

On my cutting mat (if you look closely it's warped at front where I forgot to use heat resistant mat when embossing - doh!) is a paper pad & some orange flowers ready for my next magazine project.

Centre back is a part-finished butterfly project inspired by something I saw on C&C. Not happy with it so will take a diff approach. Then there's my trusty Cuttlebug & the spotty caddy stuffed with the essentials.

On the right is my big yellow box where I have all my unmounted stamps catalogued, with a couple if new sets at the front of the box waiting to be added. I have 10 (gulp!) foolscap ring binders full of stamps sorted into categories - 3 folders of florals!!! Next project is to unmount my boxes of wooden stamps & integrate with the rest - I find I don't use my wooden stamps that much as they are piled in boxes, but I have some lovely ones, so they need sorting!

Right, enough waffle (sorry Julia!) off to desk hop! If you want to join in pop over to Julia's Stamping Ground.

Stop press!! The universe must have heard I was lacking enthusiasm, cos postie just delivered this little lot :-))

Thanks for stopping by

Debs x


Tuesday, 26 February 2013

Cold enough for Christmas!

It's still freezing here, so making Christmas cards seems totally right! Just had time to play before I have to nip off to the  torture chamber hairdresser ! I hate going to the hairdresser, so I tend to wait until I look like the Dulux dog before I give in and submit, and it's that time of the year again [sigh]

This card was inspired by Crafty hazelnuts challenge where the theme is '1 word is sufficient'

The Stamp is an old but much loved Personal impressions wooden stamp - think its called 'Hilltop Village'. Stamped & heat embossed with WOW black sparkle, then coloured with pro markers. Double mounted on white & black card.
The main image is Mounted on silver mirror card embossed with Cuttlebug Snowflakes folder then mounted on plain white card. The Peace star is from an old kit, mounted on black card to match the rest of the card

Also entered in:
Rudolph Day Challenge
Crafty Hazelnuts Christmas Extra

Thanks for stopping by!

Debs x

Wednesday, 27 June 2012

WOYWW 160


So I had a fun weekend of making baby cards for a friend, couldn't decide which one I liked better, but now I'm leaning towards the 'BABY' one.

I also found time to try something I've been meaning to do for ages - I've seen all of these sets of mini stamps/tapestry stamps used at shows, and very nearly bought them as I loved the patterns they were able to build with a few small stamps. But I resisted buying them on the basis that I had so many stamps at home. So this weekend I went through all my stamps and pulled out any diddy ones that I thought might work, and had a play. The first couple of attempts weren't that great, think I put way too much on the page, didn't know when to stop! But they started to get better, and this is what i came up with..........

I'm thinking they would be a great subject for one of my classes, so will see what my ladies think!

OK, no pic of my desk today, only what I've made on it :-) I'm off now to link up with Julia here, and to join in her weekly trip around the world to see what other crafters have been up to!

Happy crafting

Debs xx

Monday, 4 June 2012

Spotlighting rubber stamping


 Hi blog hoppers, this is the sample made for our last class in Chandlers Ford. We focused on the spotlighting technique,where you pick a part of your image and stamp it again, colour it so that it stands out. We also double embossed our spotlighted section so that it really jumped out at you, and used embossed Core-dinations card as a backing - the cards the ladies made in class were fab!  Lots of bright colours and great finished projects.

Next class is at Bella Crafts in Fair Oak this coming Saturday, this will be a Pro Markers class focused on florals and landscapes. It is a repeat of one we did earlier in the year, where we were over-subscribed, so we agreed to tun it again for those who were disappointed to not get in the first time.

Hope you all have a lovely Jubilee weekend, I'm off to do some more crafting ;-)

Thanks for stopping by

Debs x

Wednesday, 9 May 2012

WOYWW 153 and a busy desk!


Hi everyone, I've been quiet for a few weeks, been a bit chaotic here, and not much crafting being done at all
 :-(.................But this Bank Holiday weekend I managed to spend some time in the craft room, and this is how I left it...........messy, huh?

I know those lovely crafters who manage to tidy away after themselves will be looking at that and thinking OMG! I am a messy crafter, and even though I now have a lovely craft room and big desk, still end up with piles that threaten to overwhelm the desk.

Quick tour round my desk, bottom left some papers for a DT project I was finishing off, with my ultra sticky tape, and just above that a couple of older projects that I love and am trying to decide how to display. Above that to the left you can see my trusty heat tool peeking into the pic, and my DAB radio, cos I have to have music while I craft! I am often heard singing along to the Bee Gees....ssssssshhhh, don't tell anyone!!

then you ahve my craft caddy stuffed with essentials, behind that various shades of pink tissue paper for making paper carnations, my memento black inkpad, which never leaves my desk, a pile of paper with sketches and notes for cards (think back of a fag packet style!), my steel edge ruler, craft knife, reels of tape, and 2 pairs of scissors, one detail scissors, and one pair I use just for 'sticky stuff'.

That's my desk, if you're wondering why i;m sharing hop on over to Julia's stamping ground where she hosts the fab Whats on Your Workdesk Weds blog hop through craft land

happy crafting!!

Debs xx

Saturday, 28 April 2012

TP Mini albums - made from loo rolls!

Hi blog hoppers, it's been a while since my last post, and my only excuse is work - and not the crafty kind!

Several people have commented on how quiet I've been lately, so I resolve to try to post more often :-)

This is a pic of a recently completed mini album. We made loo roll mini albums in class a few weeks ago, and we had so much fun!  You make them by squashing the inner tubes from loo rolls ( or kitchen roll if you don't want to use loo rolls!) I ran mine through my cuttlebug to squash them as flat as possible.

I covered mine in a range of co-ordinating papers by covering the loo roll in PVA glue and wrapping paper around then trimming. If you want a pocket just fold one end up on the second side and glue only the left and right edges on that page


You can slip tags inside the ends of the loo rolls, add pockets, mini envelopes, photo corners and embellishments and tags of all kinds. I used a cropa dile to punch and set eyelets and book rings to bind the pages.  It takes a while to stamp all the tags and mount all the photos, but the end result is so cute - I have another 2 part finished :-)

Last week's class in Chandlers Ford covered mica powders and we had a lovely sparkly time dusting, painting, spritzing and spraying! I feel like I owe all my ladies' other halves an apology as they all went away with plans to stock up on mica powders and masks :-)

Off now for a cuppa and kitty cuddle - happy crafting

Debs xx

Wednesday, 4 April 2012

WOYWW 148 -Easter Bunnies

hi blogland! Just a quick post from me tonight as I'm shattered, and there's nothing much happening on my craft desk so thought I would share some Easter cards I made for a feature in Making Cards magazine.


The stamp is from the Helz Cuppleditch bloom & grow range, and is so cute I couldn't resist! The panels are cut with a range of different Nestabilities, stamped and coloured with Pro Markers. I've picked colours out of the main pic and used those to colour the edges of a larger nestability die cut to create a perfect colour matched background.  I stamped the images a few times, and cut out parts of the image to layer up and to use as mini images on some of the panels. I think they look really spring-like!

Anyway, enough for now. If you came to this through WOYWW enjoy your trip around the crafty world via Julia's stamping ground!

Thanks for stopping by

Debs x
Wednesday, 28 March 2012

WOYWW 147 and Pro Markers


I've been absent from blogland for past couple of weeks - phenomenally busy and with new job taking up all my time, so not much crafting done in the Willis house :-(  Really missed my WOYWW fix last week, so will do my best to visit lots of crafty boltholes this week, spread over the next few days. If you want to see what other crafters are up to visit Julia's Stamping Ground and join in the blog hopping fun!

But I have the day off today and this is my desk today, batch stamping lots of images for a Pro Marker workshop this Saturday. Got to get it done today cos I'm working tomorrow and Friday, so today's my last chance!  Took a few mins to colour one of my favourite images, the little row of mice from Penny Black 'Micey Nice Day' - they are so cute I love these meeces!


Aren't they sweet? If we have enough time on Saturday this will be the 'challenge' image at the end of the class (which is focused on skin tones, hair and fur) to make each little mouse a different colour using only a few pens.

Well, that's me for today, hopefully I will get a bit more time soon, as I am missing my crafty play time

Thanks for stopping by

Debs x

Friday, 16 March 2012

It's Friday, it's 5 to 5 , and time for.........................

Anyone remember this???? I used to love Crackerjack, and always wanted to win a Crackerjack Pen LoL!  This popped into my head as I was listening to the radio and the presenter said 'it's Friday and it's 5 to5' but I think he was too young to remember the rest :-)

There's a 'guess the year' programme on our local radio station in the mornings, and it's fun with all the memories the old songs generate, but so many of them have been used in ads, I now end up singing the ad jingle instead of the actual lyrics - those ad men must have been good at their jobs lol!

OK, so it IS Friday and I'm about to pack up crafting for the day and have a well deserved cuppa so I thougI would share some recent projects and a sneaky peek of a DT project I finished today!
This is a wedding card using pearl embossing powders and a brocade background stamp, so pretty to work with. Even embossed the background card behind the panel cos I got carried away with the lovely pearl effects!


These two are cute boxes I made recently, and all 3 projects will be on show at the NEC next week on the WOW embossing stand

Finally, the sneaky peek...............

These are easel drawer cards, and they are so much fun to make (showed some stamped versions in an old post). You can really go to town on the decoration, and there is a little drawer in the base that you can fit yummy chocs in (or something more boring if you are so inclined!). I got a bit carried away with decorating these two, feathers, leaves, flowers, butterflies - a cornucopia of embellishments!

OK, that's it for today, my feet are freezing so I'm off to put the heating on and hit the biccies!

Have a fab weekend, thanks for stopping by

Debs x

Wednesday, 14 March 2012

WOYWW 145 and cogs


This is my desk today, not too messy, just a little project in the middle half finished. On the left you can see the lead to my heat gun, a finished tag project, and my trusty digital radio. At the back we have my ice cream tub of acrylic blocks and a pot of brushes - must find new ways to store the blocks lol!! A jiffy bag full of new stamps as part of my WOW! Embossing Powder DT goodies, and a set of large oval dies.  Not too messy at all for me - you can see both table top AND craft mat!

Much easier to keep everything relatively tidy now everything has a home on a shelf behind me.  Although I still leave stuff out at the end of the day if I know I'm coming back to work on it again.

Last pic today is my cogs all ready to go! now I'm off to link this blog to Julia's at the Stamping Ground, and I will try to get round more desks than last week!


This is a close up of my die cut cogs - all embossed and ready to use on my next project - got some great old metal effects with a mix of Earth Tones and Verdigris embossing powders!


Tuesday, 6 March 2012

Craft Room at last!

I've been a bit absent from the blog for the past week or so, partly cos I've been busy with deadlines, and partly cos I've been converting one of my bedrooms into a Craft Room!  Yippee! :-)

I've worked from home for a long time, and had a bedroom as an office for years, but my crafting was always done in the dining room/kitchen/living room/floor etc etc! (As many of you will know from past pics on the blog :-)  I decided to tidy (ahem - use that word loosely) my office and get rid of all unnecessary paperwork/reference material etc. Vast quantities of shredding and about 6 wheelie bins of recycling later............................ ta daaaah!!!


I now have all of my crafting supplies in one room - huge improvement! And a dedicated desk where I can leave 'work in progress' and shut the door, no more working out how we are going to eat at the same table lol!  In the second pic you can just see the top shelf is full of files - 11 files of unmounted stamps to be precise [gulp!} and that doesn't include the 2 baskets of wooden stamps, the box of sentiment stamps, the box of Christmas stamps.....
But now my Cuttlebug is accessible without removing 3 layers of other stuff to get to it - hurrah! 

And this is the first project I made at my new desk using some of my new goodies.....

The card front is covered in dark red paper which is overstamped with dragonflies in dark orange ink - nice subtle effect. I clear embossed (WOW! clear gloss powder - of course!) the grasses and flowers (Artemio clear stamp set) at the bottom of the card, then used my gorgeous Inkylicious ink dusters with Big and Juicy 'Soothing Sunset', Distress Inks Wild Honey and Brushed Corduroy to shade the background.

I overstamped the grasses with the different shades of ink that I used on the backgound, and then used my new Inkylicious script stamp all over the background (it's only a small stamp, but you can repeat it over and over to create a whole page of script and it looks like a continuous stamp - magic!)

Finished the background by stamping a few dragonflies, then used a Marianne die to cut out a lacey frame, coloured the die with the same colours using my brushes, then stamped the verse on the die cut to finish, and mounted on the front of the card.  I haven't made anything 'just cos I wanted to' for a little while, and this gave me so much pleasure! Hope you like it, and sorry if I've rambled on a bit ;-)

Thanks for stopping by

Debs x

Tuesday, 31 January 2012

Hide n Seek card

 The sun is shining today, but it's really cold here! I've not had much time to be creative this past week, but wanted to share my Sunday afternoon creation.

I love playing with paper mechanics, when a card does something other than simply 'open' which explains my recent obsession with boxes, and the Matchbox Easel card I have planned for classes this week!

This is a Hide n Seek card, where the card has a 'hidden' interior section.

This is the first thing you see when you open the card, a lovely series of stamped and layered panels. Then, if you close the card and push the outer edges back ,when you open the card again.........

Ta Da!!  A 'hidden' message, in this case, the panels say 'With Love'

this is actually a really easy card to make, but takes ages to decorate all the panels. It's great fun though, both to make and to receive.

Start with a piece of A4, crease and fold to an A5, then add further creases as though it is a gatefold card, mountain fold the centre crease, and valley fold the 2 outer creases.

On the centre fold, mark and cut 3 evenly spaced horizontal slits, cutting from the centre fold to the outer folds at 5.25, 10.5 & 15.75 cm.

Fold each panel you have created alternately left and right. Cut 4 panels of mirror board at 21cm x 7.2cm , sandwich them back to back in pairs. Slide one mirror strip through the 2 left hand panels, and the other through the 2 right hand panels.

fold the card open and closed a few times to make sure it folds smoothly, then decorate to your hearts content!

Thanks for stopping by

Debs


Monday, 9 January 2012

WOW! Design Team

Some of you will already know that I am on the DT for WOW Embossing Powders, and that I made a bunch of samples for the NEC show in November.  The DT is now up and running, and the blog will be updated soon and introduce you to the team and their designs during the course of this week.

Look out for some amazing inspiration, challenges and giveaways and check out the blogs of the rest of the DT from the side panel!

this is one of my designs exhibited at the NEC.............. more to follow!

thanks for stopping by!
Debs x

Wednesday, 23 November 2011

WOYWW 129 - and self inflicted mojo departure!

OK, so I normally love to make Christmas cards, I actually started in January this year (only cos I had a couple of free days when I was bored & still in the christmas spirit, so made a few in the first week!!)  

Then pretty much nothing until I had to start making Christmas samples for publication, and that was in the summer! Made a bunch of sample cards and then forgot about my own Christmas cards, until this week, when I decided I really should get my act together. So I decided to get all clever and make a batch of snowmen cards.  Aaaaaaaaaaaaaaaaargh!!  I have discovered that batch making cards is a sure fire way to kill my crafty mojo! 
As you can see from the pic above,  my desk has a few snowmen, and I couldn't cope with them all being the same, so started changing the colours, and I stamped off a load of identical 'SNOW' letters, and cut them all out, made a couple of cards with the words on, and  now I'm bored with looking at them! 

So I am going to resort to my crafty inspiration - tea and chocolate digestives (and tonight's Pro Marker class!) And of course, taking a world-wide wander through other people's crafty inspiration over at Julia's WOYWW blog hop.

thanks for stopping by, and hopefully there will be something more fun to see next time you visit, and the crafty mojo will have reappeared courtesy of Mr McVitie's biscuits!

Deb x