I saw these on Create & Craft last week, they were selling pre-cut kits so I decided to work it out for myself! They're actually far easier than they look & I was thrilled with the end result :-)
The box folds flat & fits into a C5 envelope for posting - perfect!
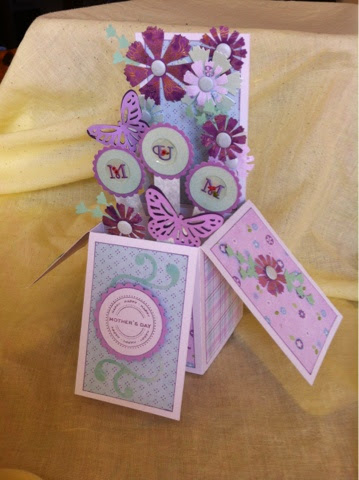
The basic box is really quick to assemble - its the decoration that takes a while! I used lots of snippets from the Nitwits Collection 'Promises. 8x8 paper pad & my snippets box, a couple of punches & die cuts & some card candi to finish. I enjoyed making it so much, I made a second, more sophisticated version using Craftwork Cards Vogue Collection papers......

I'm linking this to Pixies crafty playground, since I used so many snippets, and I haven't visited for a while, so might need to sneak quietly through the gate and hide behind the roundabout!
EDIT:
Basic instructions:
Lay A4 card landscape position, mark vertical lines at 7, 14, 21 & 28 cm. mark horizontal line across centre of card at 10.5cm from lower edge.
Score across horizontal centre line from left edge across to 21cm vertical line (across 3 panels but leave 4th unescorted - this 4th panel will be stand up back panel)
Score all lower vertical lines up to centre line, cut upper vertical lines above centre line to top edge.
At 28cm line, cut away small panel above centre horizontal line, and onlower small panel cut a diagonal line from centre horizontal line to outer right edge approx 1.5cm down to create flap.
Fold along all creases & fix flap to inside of box with strong glue or tape.
Cut 2 strips of card 2cn x 10cm. Mark on the long edge at 1.5cm & 8.5cm & score on these lines, folding the 2 end flaps in opposite directions to create a 'Z' shape. Fix these strips inside the top edge of the box, just below the upper edge, a few cm apart.
Cut small strips of acetate, fix upright to the cross pieces at different heights & fix embellishment to acetate strips
Enjoy!

