Pages

Showing posts with label Flowers. Show all posts

Thursday, 28 March 2013

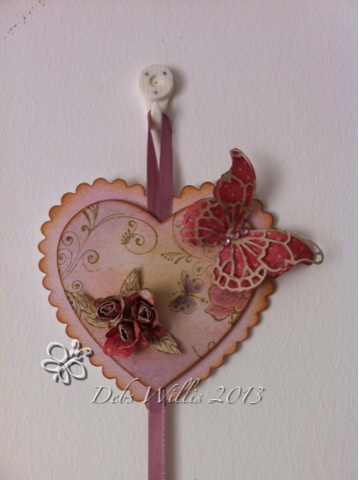
Hearts and flowers - vintage look wall hanging

This is the finished wall hanging made with hearts, some of you saw the experimental phase on my desk yesterday!

I couldn't achieve the effect I wanted with the acrylic paints, so went back to my trusty Distress Inks! really pleased with the finished effect, made with a Memory Box Butterfly die cut, some punched shapes & rolled rosebuds from K& Co McKenna papers, stamped with a mix of stamps from WOW, Creative Expressions and Dimension Stamps....

this is the full monty, hanging on my wall, and below are close up pics .....


Planning to teach this at a future workshop, should be great fun!

Thanks for stopping by

Debs x


Monday, 25 February 2013

Crafty weekend

I had a lovely crafty weekend, spent loads of time in the craft room! Some of it was spent sorting and organising - I am not a tidy crafter lol ! Some of it was spent playing and making :-) It was bitterly coldhere so didn't feel too guilty about staying in lol !

I also did a lot of blog-hopping and found several challenges that looked like fun. This card was made for the pro Marker challenge, which was in a theme of Princes or Princesses & had to feature a crown! So I dressed up my Little Prince with his own crown :-)


Entered in the following challenges:
Pro Marker Challenge
Pixies Crafty Workshop Snippets as I used paper snippets from my bit box, and more leftover flowers
Milk Coffee Challenge - Make it Cute, cos it is!


And I made progress on another scrapbook layout. I am new to scrapbooking, and I am loving it! I get to use all my card making stash, but I get to keep it when it's finished :-)


This was supposed to be a short post, as I need to do some housework (aaaargh!)

Happy crafting

Debs x


Tuesday, 19 June 2012

It's wedding season!

 Hi blog-hoppers! I've had a few commissions lately for cards on wedding themes, so thought I would share them with you.  The first one uses ready made tag toppers I've had in my stash for ages, and the colour theme was just right for this request. The die cuts are Spellbinders Grand Labels 4.  

The background layer is an old Hunky Dory Whispers pearl embossed card, and I ran the white top layer through an embossing folder - I love this particular one, which is swirling vines - think it's Crafts Too.  I added some punched swirls and a few gems to finish it off.

The second one uses a freebie download I've had since last year, from one of the crafting mags, think it was Papercraft Inspirations but not sure! Anyway, I've used it a lot!

This one was matted and layered on more Hunky Dory card, the darker layer is gold embossed, and the lighter layer is the whisper pearl again. Then I cut out a bunch of Kanban flowers I've had in my stash for years, curled and layerd them and added gems. The colour theme for this wedding was metallic turquoise, and I added Stickles glitter glue to the tiny flowers on the topper and all over the skirt of the dress - hard to see unless you look really close, but so pretty!


I have a class in Chandlers Ford this afternoon and another tomorrow night, and this is what we will be making - I got carried away with the flower theme after the wedding card!!


The Grand Labels 4 die came out again - Labels 4 has to be my most used die, it's brilliant! the larger flowers are made from cutting spiral circles, and I've added different sizes of spirals for interest, plus punched flowers, swirls and leaves.

OK, time to go pack the craft box! Thanks for stopping by, and happy crafting :-)

Debs x

Tuesday, 6 March 2012

Craft Room at last!

I've been a bit absent from the blog for the past week or so, partly cos I've been busy with deadlines, and partly cos I've been converting one of my bedrooms into a Craft Room!  Yippee! :-)

I've worked from home for a long time, and had a bedroom as an office for years, but my crafting was always done in the dining room/kitchen/living room/floor etc etc! (As many of you will know from past pics on the blog :-)  I decided to tidy (ahem - use that word loosely) my office and get rid of all unnecessary paperwork/reference material etc. Vast quantities of shredding and about 6 wheelie bins of recycling later............................ ta daaaah!!!


I now have all of my crafting supplies in one room - huge improvement! And a dedicated desk where I can leave 'work in progress' and shut the door, no more working out how we are going to eat at the same table lol!  In the second pic you can just see the top shelf is full of files - 11 files of unmounted stamps to be precise [gulp!} and that doesn't include the 2 baskets of wooden stamps, the box of sentiment stamps, the box of Christmas stamps.....
But now my Cuttlebug is accessible without removing 3 layers of other stuff to get to it - hurrah! 

And this is the first project I made at my new desk using some of my new goodies.....

The card front is covered in dark red paper which is overstamped with dragonflies in dark orange ink - nice subtle effect. I clear embossed (WOW! clear gloss powder - of course!) the grasses and flowers (Artemio clear stamp set) at the bottom of the card, then used my gorgeous Inkylicious ink dusters with Big and Juicy 'Soothing Sunset', Distress Inks Wild Honey and Brushed Corduroy to shade the background.

I overstamped the grasses with the different shades of ink that I used on the backgound, and then used my new Inkylicious script stamp all over the background (it's only a small stamp, but you can repeat it over and over to create a whole page of script and it looks like a continuous stamp - magic!)

Finished the background by stamping a few dragonflies, then used a Marianne die to cut out a lacey frame, coloured the die with the same colours using my brushes, then stamped the verse on the die cut to finish, and mounted on the front of the card.  I haven't made anything 'just cos I wanted to' for a little while, and this gave me so much pleasure! Hope you like it, and sorry if I've rambled on a bit ;-)

Thanks for stopping by

Debs x

Thursday, 27 October 2011

Shaving Foam Marbled paper

A few people have asked about the shaving foam technique, so I thought I would show you what we made last night and explain how.
 This is the marbled paper we created -what's left of it! this one got torn while it was still damp.

I saw Ali Reeve demo this on C&C, and there are videos on u-tube if you take a look. It's very easy to do.  Spray a layer of shaving foam (better than gel) in bottom of an A4 plastic box (or in a clean sink so you can wash it away after). Squirt a few sprays of ink onto the foam - I use Stamps Away Colour Mist, but you can use any re-inker or alcohol inks. the only thing that doesn't work well is something like Mica mists, as they are so diluted with water they just make the foam collapse.

Use the end of a paintbrush or pencil to make swirls in the inked foam, and when you are happy with the pattern, press a piece of paper or card gently onto the foam until the underside is covered with foam. Lay it face up on your craft mat and press a clean piece of paper on top of the foam covered side and you get 2 sheets - the first impression will always be darker than the second, but it's quite nice to create different depths of colour.  Then you just wipe away the excess foam with kitchen roll, or if you're being really thrifty, use an old credit card to scrape off the foam and pop it back in the box. This sample only used a little ink, but you can use a lot and create quite a strong colour - it's fun to experiment!


These are some of the embellishments we made with our marbled card and paper, different flowers, feathers and a rosette (we ran out of time on the rosette cos we had so much fun getting messy with the foam lol lol!)  Or you can use it as background paper, or to create an accent on a card with matting and layering.


And I just had to share with you a picture of my ladies from last night's class, we had 3 generations of one family there, isn't that lovely? We all had a great time, and got VERY mucky!


thanks for stopping by

Debs x

Wednesday, 12 October 2011

WOYWW 123-Halloween and Flowers

So this is my work space this morning - if you're not sure why I'm posting a photo of my messy table, hop on over to Julia's blog where she hosts the biggest snoopathon!!  You get to check out the craft desks and workspaces of other crafters. You get to see what other people are making, and feel better about your own messy (in my case) space!  lol lol

Bottom left of pic are the kits I'm getting ready for tonight's class, and just above that you can see my Halloween punch - I've been punching out gazillions of little black bats - guess what tonight's project is?????????? Witches and bats pumpkins and flying (yes, flying!!) ghosties!!

Above the punch is an empty ice cream container - great size for craft storage, so I will just have to keep eating the ice cream! Also a part-finished DT project I'm working on - not quite coming together yet.  Just to the right of centre are a few pink tissue paper carnations I've been experimenting with, I'm quite chuffed at how they turned out and they are a doddle to make, AND they squash flat to go in the post, and it just makes them look better! Will add them to a later post - thinking of dunking them in glitter to bling them up a bit!

On the far right is a bag of K&Co embellishments and a few packs of die cuts and rub on's. I've had a sort out and I'm trying to decide what to do with them, cos I don't think I'll use them. 

Oh yeah, and in the front of the pic, the placemats from last night's dinner, which is, after all, only the secondary purpose of this table lol lol!!

Happy WOYWW everyone

Debs x

Wednesday, 6 July 2011

Welcome to my Blog!

My first post - welcome!  I love sharing crafting ideas and inspiration, and I thought I would post a few pics of recent creations as a starting point.

Garden Gate


 The Garden Gate is a welcome home card for a friend who has had a long stay in hospital and is thrilled to be coming home at last.  It was made by inking the stamps directly with Whispers watercolour pens, and uses a mix of Flower Soft stamps, Martha Stewart corner punch and core-dinations card


Blue Music was published in Making Cards a few months ago, and is stamped using Versafine and a Musical Collage Set from Butterfly Kisses


Get Well Ted is coloured with Pro Markers and uses Spellbinders Dies with the layers coloured with Pro Markers to match the main pic exactly


Wine Lovers Happy Birthday uses Distress inks and a Fiskars clear stamp set, with the background stamped with Distress inks, and then using them again to watercolour the stamped images

Enjoy!

Debs