Pages

Thursday, 6 June 2013

Thank you cards


These were made as Thank You cards for the lovely Julia and Jan for organising the crop on Saturday - should be safe to post now assuming mr postie has delivered on Time!

They were made using leftovers from various K&Co papers, the lovely Tattered Florals that were a gift from Shaz, and my HOTP layering Tool Kit. - great fun! The butterfly in the first pic was found languishing at the bottom of a box, from another K&Co kit (I am rather partial!!)  On the second card, I didn't have quite enough of the teal to make a full size layer as all the pieces were pre-creased down the centre from a previous class, so I had to improvise, and made a border, then there wasn't quite enough of the floral layer, so had to make the top layer shorter than the base layer, and hide the crease with a judicious butterfly, but it looks ok I think

Linking them to Pixies Snippets Playground  cos of copious use of leftovers, snippets and rummage bitz!

Thanks ladies, I had a ball at the Crop!!

Debs x

Wednesday, 5 June 2013

WOYWW


So this is my desk today, on the left a pile of roses & leaves made of air dry clay & painted with cosmic shimmer watercolours. Hiding (not very well!) behind the spotty caddy is my latest DT project using the lovely Beautiful Shoes stamps from Katy Sue & some shrink plastic. And on my cutting mat the project that will use the clay flowers. 

And the WOYWW crop....oh my! (See Mondays post for details) What a great time was had by all. I didn't get much crafting done but had a ball just the same :-) Met lots of lovely deskers and brought home this lovely pile of goodies.....

And a close up of those gorgeous ATC's....

And finally...... The Mötley Crop Crew in all their glory :-)) (Thanks to Gordon Mr LLJ for the fab pics)


Thanks to Julia the keeper of the desks, and Lunch Lady Jan for a lovely day out, I will be linking to Julia's Stamping Ground and travelling the world of desks over the next few days 

PS - for those who asked about the HOTP layering tools you can find them here - there are 2 different sets imaginatively title set 1 and set 2!! 

thanks for stopping by
Debs xx


Tuesday, 4 June 2013

Snippets and HOTP layering tools


So this is another snippets make using the lovely tattered florals donated by Shaz - this one uses some leftovers from the Sweet Owl collection by First Edition, and the new Design Tool Kit from Hot off The Press (available here)   - didn't think I would use this as I love my Cuttlebug and dies, but as I have been crafting on my lap, they have been invaluable! Covered the back of the card in a sheet that had a small shape die cut form it, and managed to cover that with the stripey off cut, shaped and cut out using the layering Tool Kit.  butterflies and tag also from snippets using the layering Tool Kit, and the wispy bits are the tiny trimmings from the backing sheet, curled over my scissors - I really like this look, so there will be more of these loL!

this is my second entry in the Snippets challenge this week - I am in love with both sets of stamps on offer, so will be making a third entry too!!

Thanks for stopping by

Debs x

Monday, 3 June 2013

WOYWW Crop

What a lovely day it was on Saturday - meeting up with so many WOYWW'ers! Thanks so much to Julia and Jan for organising the day - I didn't get much crafting done - but a lot of laughing and chatting :-)

I got to meet so many people - apologies if I didn't get a chance to chat with you -there  just weren't enough hours lol!! I saw Mary Anne's beautiful quilts, Zoe's amazing colouring (she's way too modest!) Saw Debs cute kitten with wool card - great idea! Made a button stem for mortis bouquet, found out Janet lives just down the road (coffee & cake soon!) met the famous Fergus who takes Hettie everywhere :-) Showed Dolores how to make air clay roses, cut myself some die cuts (with a lot of help from Julia!!) and received some lovely ready cut tattered florals from the amazingly generous Shaz - they must have taken ages to cut so many! Saw Helen's beautiful journal and so much more......!

And we ate loads, laughed loads, made some money for a good cause and returned home absolutely shattered .-)) thanks to everyone who helped me with the mobility issues - hopefully next time we get together I will be able to walk, talk and hold a plate - oooh such a goal to have lol!!!

The lovely tattered florals from Shaz inspired me, and took Janet's advice and  gathered lots of goodies together to be carted downstairs. Spent a happy few hours crafting on my lap tray with the die cuts whilst also using up snippets to create this.....the wispy bits around the flower are the teeny little strips cut off from the backing panel to fit the card, then curled with the edge of the scissors and glued under the flower with the amazing 'glues anything' Pinflair :-)

Then I had a load of teeny snippets left from that one, so I made this one with leftover snippets from my snippets make! Still with me?? I glued the triangles cut from the ends of the banner strips on the previous card to the flower petals - was quite chuffed with the resulting co-ordinated flower! So I am entering them in Pixies Playground Snippets 


Ok, this post is way too long, and I have work to do, but have more snippets makes to share later in the week :-)

Happy crafting
Debs xx

Friday, 24 May 2013

Make in minutes


Hi everyone, hope you're having a good week. 

These cards are featured in this months Making Cards magazine, and were all made from the Papermania Hot Diggity Dog collection, which is so much fun to use!


They're all really easy to make, and the background papers are all yummy candy colours that work brilliantly with the toppers. And the kits have loads in them so great value for money. 

My favourite has to be the little dog in a jumper, who's saying 'does my bum look big in this!' I can so relate lol!!!

Thanks to all those kind bloggers who wished me luck with the house move - its daunting! My craft room is the only one that hasn't been de-cluttered, my argument is I know where everything is and I still need to use it lol!!! 

Also thanks for the kind thoughts about my poorly knee - got to get it x-rayed to see what's going on. Probable ligament damage and maybe some arthritis - obviously reached that age when it all starts falling apart :-)). Main problem is stairs - and my craft room is upstairs - doh!

Have a great holiday weekend

Thanks for stopping by

Debs x

Wednesday, 22 May 2013

WOYWW

I've been away from blogland for the last couple of weeks, as I've been spending all
My time getting out house up together ready to go on the market for sale. 14 years of accumulated clutter had to be sorted (still not finished!!!)

Told Agents not to bother photographing my craft room lol!! But here it is for my WOYWW friends :-)  If you want to join in the desk hop, check out Julia's blog here


I;m in the middle of sorting materials and kits for a class next week (trying to keep ahead of myself for a change!) so you can see a pile of papers, stamps and card candi in the little boxes. At the bottom of the pic is a cute little butterfly notebook given to me by my sis-in-law.

I will be checking out desks later, but realistically it will probably be the weekend before I get to see them - in the meantime, to anyone affected by the Oklahoma tornado, know that there are many of us thinking of you and hoping that you and your families are safe - the devastation this caused is heart-wrenching, and you are in our thoughts

thanks for stopping by

Debs xx

Wednesday, 8 May 2013

WOYWW & a tidy desk!

This was my desk for a brief moment in time earlier today......


but then I sat down and started playing with my Martha Stewart air dry clay! 


This is in preparation for next weeks classes when we will be making lotsof  different embellishments, using clay, shrink plastic, angelina fibres, UTEE, ribbon roses and paper flowers! And I'm having a lot of fun making the samples :-)

I wasn't able to join in WOYWW last week, so hope to catch up with quite a few of you over the next few days via Julia's wonderful blog hop

Happy crafting!

Debs x


Saturday, 4 May 2013

Birthday cat & spring cleaning!

Not much crafting happening in the Willis house this week as it's been pretty busy. And I've even started a bit of a spring clean! Unheard of in this house :-)

Only had time to make a quick card for a cat-loving friend from a lovely Kanban kit I bought last summer

Hope you're enjoying the holiday weekend, and that you see some spring sunshine wherever you are
:-)

Thanks for stopping by

Debs x

Saturday, 27 April 2013

Spinner card

I made One of these cards recently as a Thank You for a friend & stupidly forgot to take a photo! So I made another one from the leftovers!


All the papers are from K&Co - I think it's Bailey - but I only have bits and pieces left, so I'm entering this for the snippets playground make. The flower spins and I think Di had a lot of fun playing with it lol!!

Thanks for stopping by!

Debs

Wednesday, 24 April 2013

WOYWW 203

So this is my desk today, a big old mess! In need of a major sort out, but not today.


Front and centre are my latest toys, a couple of sets of silicone moulds and some Martha Stewart air dry clay. Will be trying ultra thick embossing powder In these too! Must say I'm not impressed with the small packet of clay - hope it goes  long way! And on the windowsill you can see my new glass jars from the lovely Di over at Pixies Playground - already got a couple filled with buttons! Di hosts a weekly snippets challenge and these jars were a giveaway on her blog.

We had a beautiful sunny day here yesterday, and Barney decided to reclaim the lawn as 'his' by spending most if the day slap bang in the centre :-)


In case you're wondering why I'm sharing my messy desk, click here to visit Julia's world wide desk hop

Thanks for stopping by

Debs x


Monday, 22 April 2013

Inkylicious colour blending

Hi everyone, and welcome to my new followers, Mary Mac and Crafty Debs - I appreciate you adding me to your blog favourites!

This card is one of my designs featured in this months (May '13) edition of Making Cards.  Poor pic, I know - really need to work on the photography skills!


The base card is 8" square, the panel dies used are Spellbinders Mega Curved Rectangles, decorated with Joy crafts flourishes 6002/0020 & 6002/0033 and memory Box Butterfly dies Vivienne & Darla.  The stamp set used is my current favourite, 'Oriental Awakenings' from Inkylicious.

All the inks used are Distress Inks, applied with Inklyicious Ink Dusters to give a lovely soft finish.

The colours are actually much softer than they look in this pic, but my rubbish photography has flattened and darkened the colours - must try harder lol!!

Thanks for stopping by

Debs x


Friday, 19 April 2013

Flowerpot thank you card

This is based on a Split Coast Stampers tutorial I saw on you tube, and I've wanted to try it for a while but not had the time (you know how that goes, right??)  It's a basic fold with aperture at the top, trimmed diagonally at the sides to the shape of a flowerpot, then add a punched border and a tag inside plus tons of flowers - very therapeutic all that cutting and sticking :-)

And I got to use up lots of snippets from my First Edition New Leaf pad, so entering this in Pixies Snippets Challenge!


Thanks for stopping by

Debs x


Wednesday, 17 April 2013

WOYWW and the trials of colour matching!

This is my desk yesterday. Not changed as I had a class yesterday afternoon


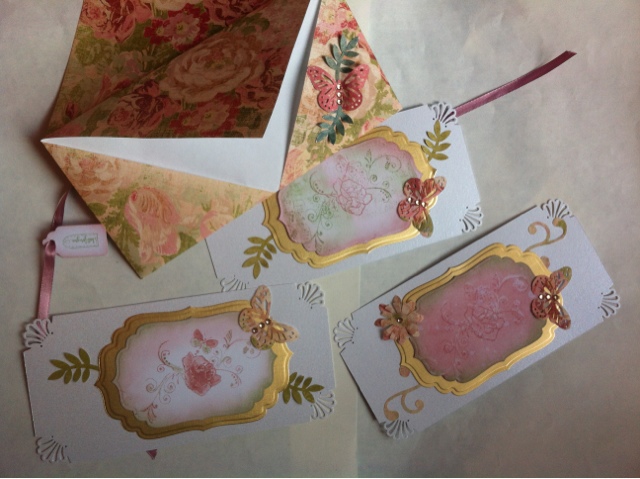
On the right you can see a selection of 12x 12  papers, getting ready for my class. I then needed to find a contrast paper for each, toning ribbon and card. If you've ever sat and spent ages matching up colours for a card, multiply this x 16, and you'll have some idea of how long this process can take when prepping a class! LOL! And this is what we made.......


The envelope is folded from one 12 x 12 sheet into a DL sized envelope with 2 outer flap envelope openings and 1 inner 'secret' compartment.......


and we made 3 tag cards with stamped panels to decorate - I was really pleased with the vintage style finished project


So I'm off to hop around crafty desks around the world, where crafters share their desks and inspiration via Julia's woyww page.

Thanks for stopping by

Debs xx


Monday, 15 April 2013

Scrapping the good...and the not so good!

I've been a bit busy for the last week and not much crafting was done. But there was a Grand Prix this weekend, which means hours of crafty pleasure for me :-)

So I finished another couple of scrapbook pages from last years holiday. And in the spirit of scrapping the whole experience, one of these pages is about our noisy cabin and my seasick day :-(

Thanks for stopping by

Debs x

Friday, 5 April 2013

Using drinks cans to craft metal embellishments

This is a photo heavy tutorial!

I've used cans to supply craft metal for some time (and Hubby so enjoys helping with the supplies lol!!).  I taught my craft class this technique in a recent die - cutting class. A few people on the blog recently asked for a step by step tutorial, so here 'tis!

I'm sure you can find a video on you tube, and there are bound to be better (and safer!) ways to do this, but this is what works for me....

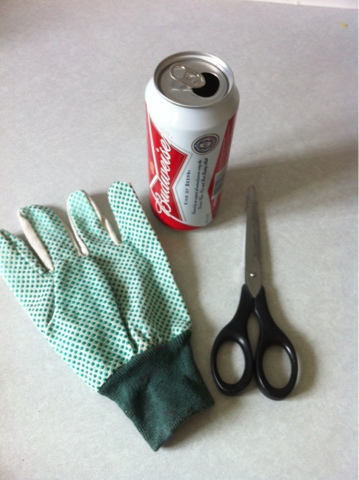
You will need.....scissors and an empty, clean drinks can (food cans are too thick and don't work) - soft drinks are just as effective, but this is what''s readily available in the Willis house!

the gardening glove is my nod to health and Safety, as cutting the can exposes some nasty sharp edges.  Please don't use your best crafty scissors, I use an old cheapo pair that aren't used for anything special - if you have one of those super duper knives that cut anything ( as sold on various tv shopping channels!) that would probably work too!

The first thing you do is use one blade of the scissors and poke the point through the tin near the top........
....then make the same sort of incision near the base.  I find it easier to puncture top and bottom whilst the can is still intact. Once you cut off one end it is much harder to puncture the other end. Then you cut off one end starting at the incision you just made - I do this still using one blade of the scissors in a sawing motion, you might find it easier to cut with them using them as actual scissors!

Once you've removed both top and bottom, you will be left with a tin tube and two ends......
 
  The next step is to change it from a tube to a flat piece of metal.  So use your scissors to cut a straight line up the length of the can - I find it easiest to follow the line where all the text ends, it's usually a good guide, but will obviously depend on the manufacturer.

....this will leave you with a tight tube, but probably lots of nasty sticky out ends of metal!  These are very dangerous, and part of the reason for the garden glove - you will really know it if you catch your hand on one of these little shards! If you're anything like me the first time I did this, the air will turn blue :-) so USE A GLOVE!! Ahem, sorry about the lecture, soap box has been returned to its resting place lol!

So you need to trim the 2 ends to give even edges with no shards. I sometimes get a large shard where I've been a bit vigorous with my cutting! So the size of this shard determines how much I need to cut off to get an even edge....

You should now have a nice even length of metal (still tightly rolled!) with no shards or uneven edges.  You can throw all the offcuts away, and this is how I straighten out the tube.....

.....I pull the tube over the edge of my kitchen worktop several times to flatten it! You won't get it completely flat, but enough to work with, and once you start cutting and embossing, it will flatten out even more.

Now for the fun bit! You can die cut (I tend to tape the die to the metal)....


You can run it through an embossing folder............


and don't waste the 'waste'! These make great frames for scrapbook pages or cards....


Once you're done, you can colour with alcohol inks, and I find the best adhesive is Pinflair glue gel (or any silicone gel) as the metal may not be totally flat, a flexible adhesive works best.

Hope this helps you upcycle those cans, and I would love to see anything you make with them!!

Happy crafting

Debs x


More Christmas snippets!

This card is a variation on a snippets make from last week, I just cut lots of small squares, and laid them on the A6 card like a diamond patchwork,and added faux stitching. Then used the last few layers of the stacker topper I used on the card in my previous post - I hardly ever use all the layers of any decoupage/stackers on one card - always conscious of Mr Posties need for lower rate postage to fit a card thru the annoying skinny slot!!!

I really struggle to use A6 cards - I prefer larger Cards, and I am particularly into square cards at the moment. I find it easier to work with a larger space to decorate - what about you? Do you prefer big or small cards? This one doesn;t look quite right to me, but I'm not sure what's missing - all suggestions on a postcard please ....lol!!

I am entering this into Pixies Snippets Playground, cos everything on here is snippets, even the greeting was found lurking in my newly unearthed box of Christmas stuff! Also into Crafty Hazelnuts Christmas Challenge, cos the sentiment is one of my all time fave Christmas songs!

Happy crafting

Debs x


More snow!

Yesterday was absolutely freezing here on the South Coast, and we had light snow for most of the afternoon, thank goodness it didn't settle.

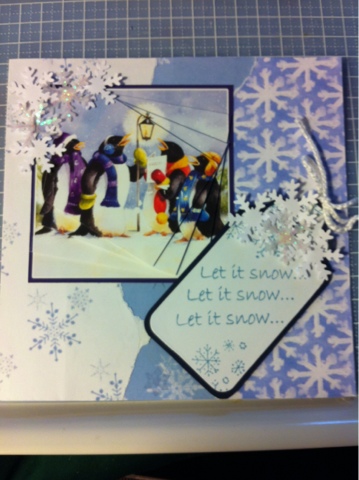
So it seemed appropriate to be making Christmas cards! This one is for Crafty Hazelnuts Christmas Challenge - 'Christmas song' - I thought this song might be appropriate for the penguins to sing!


I was having a bit of a tidy in the craft room & found 2 x A4 boxes of unidentified 'stuff'. When I opened them up I found lots of part finished Christmas projects & paper off cuts, old cards kept for upcycling, heat embossed Christmas greetings and on and on! Looks like I have enough to make several years worth of cards, and that's not counting any of my 'proper' Christmas stash!


So as this card is made from snippets, I will also enter it in Pixies Snippets Playground

Hope the weather is a bit kinder where you are!

PS - for those who asked about the tin cans, I will upload a tutorial later today or tomorrow

Debs x


Wednesday, 3 April 2013

WOYWW and daisies

Wednesday again and time to travel the craft world courtesy of Julia's stamping ground. I actually tidied my desk this week - though you wouldn't know from these photos! I had a box of bits and pieces that had been full to overflowing for weeks, and I finally sorted it all out - a very infrequent occurrence lol! Only problem is, in the process of sorting and dumping stuff, I managed to lose the cap to my [hubby's] scalpel - think it made it into the bin with a sweep of stuff off the desktop :-( See, there's a good reason why I don't tidy often!

My desk is back to normal messiness - was trying out my pebeo paints for Sheena's paint fusion technique (inspired by Hettie's work here) - had them for a while and thought I would try a few daisies and some lavender. only problem was, I couldn't find the stamps (hope they didn't go with the scalpel cap lol!!), so it ended up being just paint sans fusion!


First attempt was too much blue under the white, so tried again, looked a little better. Still need to practice!


A few people have asked about a previous WOYWW post, and how I use tin cans, and how to cut them up, so I will try to post a tutorial later in the week, with some samples. In the meantime, Shaz in Oz has been playing with tin cans & alcohol inks and produced some wonderful results!

Will be back later to check out other crafty desks, so thanks for stopping by.

Debs xx


Thursday, 28 March 2013

Hearts and flowers - vintage look wall hanging

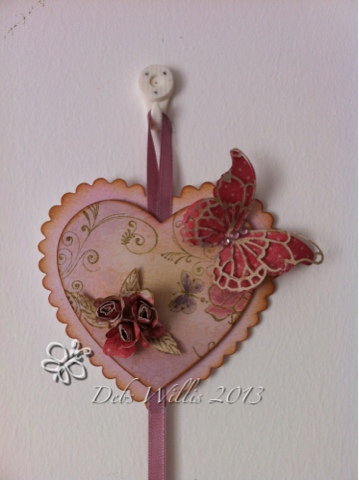
This is the finished wall hanging made with hearts, some of you saw the experimental phase on my desk yesterday!

I couldn't achieve the effect I wanted with the acrylic paints, so went back to my trusty Distress Inks! really pleased with the finished effect, made with a Memory Box Butterfly die cut, some punched shapes & rolled rosebuds from K& Co McKenna papers, stamped with a mix of stamps from WOW, Creative Expressions and Dimension Stamps....

this is the full monty, hanging on my wall, and below are close up pics .....


Planning to teach this at a future workshop, should be great fun!

Thanks for stopping by

Debs x


Wednesday, 27 March 2013

WOYWW

Wednesday again, and time to travel the craft desks of the world via Julia's blog!
 My desk, as usual is a bit of a tip lol!! 


Centre front on my scratch pad are some hearts I've been experimenting with - still can;t quite get the result I want - I'm stamping with distress Inks over an acrylic painted background, which has been heat set to ensure that it is dry, but the Distress Inks keep smudging :-(  update - if you're interested in seeing the finished heart wall hanging, click here :-)

there's a scattering of stamps, my precious Ink Dusters - always in use! And you can see towards top right my box of Cosmic Shimmer Watercolours, which have also been used on the hearts.

Short and sweet today, as requested by desk-mistress Julia, so I'm off to do a bit of tidying, and crafting, and will visit desks later today

happy crafting 

debs xx

Tuesday, 26 March 2013

Easter gift (choc!!) box

Hi everyone, and a warm welcome to my new followers - I am always thrilled that people are interested in my projects :-)

This was inspired by a kit I saw at the NEC last week (unfortunately can't remember the name of the company selling the kits, sorry!)

I played with a box template I already had & tweaked it a bit, punched the top edge with a Martha Stewart border punch, decorated with First Edition 'Sweet Owl' paper and a stamped Helz Cuppleditch image coloured with Pro Markers, then cut out & fixed in place.

This isn't what I planned to work on today but, following a visit to the osteopath this morning I needed something quick & easy I could do on my lap tray with an ice pack in place :-)

Thoroughly enjoyed making this one, which I will give filled with choccies for Easter, and can see myself making a few more before the weekend!

Thanks for stopping by

Debs x

Monday, 25 March 2013

It's so cold!


 Finding it hard to work in my craft room at the moment as I have to wear so many layers to keep warm! Still, it's an ideal time to make Christmas cards lol!!

This one came about from trying to be good and use up snippets - the background is made of 1" squares punched from leftovers, and layered on the background card as a patchwork, with faux stitching to add to the effect.  The topper is an upcycled Christmas card (I save them all!) cut with a Spellbinders die, and backed with another snippet to match.  The tiny gingham bow kind of sets off the homespun theme I was going for - but was a **** to tie using such small leftover piece of ribbon - didn't have any more of this one so had to make it work :-)

Any my upcycled topper has 3 geese on, so fits with this week's Crafty Hazelnuts theme which is '3 of anything!' - so this one is entered in the following challenges:

Pixies Snippets Playground
Crafty Hazelnuts Christmas Challenge
Sarn's Rudolph Day challenge

And I wanted to say thanks to Shaz in Oz for her advice on how to add watermarks to your photos - super helpful advice, and pointed me in the right direction :-)

Happy crafting

Debs xx