I've used cans to supply craft metal for some time (and Hubby so enjoys helping with the supplies lol!!). I taught my craft class this technique in a recent die - cutting class. A few people on the blog recently asked for a step by step tutorial, so here 'tis!
I'm sure you can find a video on you tube, and there are bound to be better (and safer!) ways to do this, but this is what works for me....
You will need.....scissors and an empty, clean drinks can (food cans are too thick and don't work) - soft drinks are just as effective, but this is what''s readily available in the Willis house!
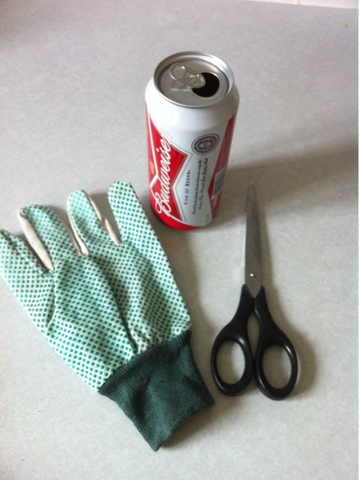
the gardening glove is my nod to health and Safety, as cutting the can exposes some nasty sharp edges. Please don't use your best crafty scissors, I use an old cheapo pair that aren't used for anything special - if you have one of those super duper knives that cut anything ( as sold on various tv shopping channels!) that would probably work too!
The first thing you do is use one blade of the scissors and poke the point through the tin near the top........

....then make the same sort of incision near the base. I find it easier to puncture top and bottom whilst the can is still intact. Once you cut off one end it is much harder to puncture the other end. Then you cut off one end starting at the incision you just made - I do this still using one blade of the scissors in a sawing motion, you might find it easier to cut with them using them as actual scissors!

Once you've removed both top and bottom, you will be left with a tin tube and two ends......

The next step is to change it from a tube to a flat piece of metal. So use your scissors to cut a straight line up the length of the can - I find it easiest to follow the line where all the text ends, it's usually a good guide, but will obviously depend on the manufacturer.


....this will leave you with a tight tube, but probably lots of nasty sticky out ends of metal! These are very dangerous, and part of the reason for the garden glove - you will really know it if you catch your hand on one of these little shards! If you're anything like me the first time I did this, the air will turn blue :-) so USE A GLOVE!! Ahem, sorry about the lecture, soap box has been returned to its resting place lol!
So you need to trim the 2 ends to give even edges with no shards. I sometimes get a large shard where I've been a bit vigorous with my cutting! So the size of this shard determines how much I need to cut off to get an even edge....


You should now have a nice even length of metal (still tightly rolled!) with no shards or uneven edges. You can throw all the offcuts away, and this is how I straighten out the tube.....


.....I pull the tube over the edge of my kitchen worktop several times to flatten it! You won't get it completely flat, but enough to work with, and once you start cutting and embossing, it will flatten out even more.
Now for the fun bit! You can die cut (I tend to tape the die to the metal)....


You can run it through an embossing folder............

and don't waste the 'waste'! These make great frames for scrapbook pages or cards....

Once you're done, you can colour with alcohol inks, and I find the best adhesive is Pinflair glue gel (or any silicone gel) as the metal may not be totally flat, a flexible adhesive works best.
Hope this helps you upcycle those cans, and I would love to see anything you make with them!!
Happy crafting
Debs x
Deb, enjoyed reading through your very well done tutorial with all the pics. You can also use the duct tape/metal bought at the home improvement stores - comes in a roll, used by electricians & air conditioning people also. Pretty inexpensive (not as much as your 'free' soda cans, but not so many sharp edges to worry. Beautiful when done with alcolhol inks. TFS
ReplyDeleteThanks for the tip Mary, will definitely try the aluminium tape!
DeleteVery nicely demonstrated Mrs. Willis. Thank you for the photo tutorial. Keep the creative craftylicious ideas coming!
ReplyDeleteGreat idea!
ReplyDeleteSo glad you go the mystery sorted...I hesitated to tell you but thought I would want to know...when i go on WOYWW there are several people whose comments do this. I thn find them by their number...but I knew I had always reached you before by clicking on your name so thought I had better let you know.
One of the girls I follow is in the midst of switching to bloglovin but it won't recognize her blog and now she doesn't show up in anyones reader or blogroll even though she is still with blogger...I wasn't sure if it was something like that...
Crafty hugs,thanks for the tip!
Maureen
Thanks Maureen, and thanks for letting me know about the blog hiccup!
DeleteI'm loving this tip Debs I'm off to raid the recycling box!! Debs F x
ReplyDeleteDebs, let me know what you find on your recycling trawl :-)
DeleteSuch a great technique! I would surely stab myself and cut myself a gazillion times...
ReplyDeleteThanks for this, Debs. I have done this in the past and it's great - but preparing the cans first is an absolute pain. You can make great embellishments and even jewellery with them. What I love best about it is that the material is FREE!!! Lol! I'm in full recycling mode at the moment and this sort of thing gives me a real kick.
ReplyDeleteShoshi