This is one of those 'before and after' posts, this pic is actually the 'after', but I wanted to show it first as it's 3 cute Xmas projects in their finished glory!
Then there's the next pic, which is the 'before and during...' pic of my desk................
So you can see the 3 projects scattered on the desk, and the template for the hexagon box on my cutting mat, and stacked under the Christmas Cracker are the papers for yet more crackers!
to the far right, just in the pic is my grotty old black craft knife. This was 'donated' by my DH some years ago (he is a draughtsman and used to use this regularly) The knife has been shrink wrapped several times, which has made it non-slip grip and has many layers on the cap, so I can shove the blade into it without worrying about my fingers - perfect, but not pretty! DH bought me a lovely pink and purple 'proper' craft knife once, but I reverted to his (now mine!!) within a few days - do you have any favourite craft tools/kit that you wouldn't be without?????
I only managed to visit a few crafters corners last week, and I'm pretty late adding my contribution to the blog hop today at Julia's, so will have to wait til tomorrow to check out the WOYWW entries, as I'm working tonight, but I;m looking forward to seeing what's out there in craft cyberspace!
Happy WOYWW
Debs x
Wednesday, 30 November 2011
Monday, 28 November 2011
Mens cards - and recovered mojo!
Thought I would share a couple of men's cards that were a recent DT project. The first one is a birthday cake made out of tools and bits of wood. The birthday candles are screws with little flames added to the top, and the background paper with hammers is from a Joanna Sheen Messy Rabbit CD.
I stamped the image several times (you can see the full stamped image in the next photo) and coloured with Pro Markers, then I set about cutting it into pieces and assembling into a 'cake' - I was quite pleased with the end result - something fun and a bit different.
This second card uses the whole stamp (Personal Impressions - from Hobbycraft) as a background frame for my birthday message. Again, I stamped it out a couple of times and cut out individual pieces to decoupage on the main pic. Added a DIY guy from another Personal Impressions set - Cute Characters 1 - and used a cut out saw to create a stop for my easel card. Background paper from Messy Rabbit cd again (great papers on there!)
My DH is always pottering in the garage, and in our house it's known as 'the man's room!' so thought this was quite appropriate!
Been a strange week in our house, brother in law took a turn for the worse, then rallied, still in ICU, but slight improvement. I had the lurgy - one of those strange ones where only one side of your nose is runny, and your head feels like it's full of soggy cotton wool, but to the outside world you appear 'normal' (well, as normal as I ever look lol!) - and I blame this (and my pathetic attempt at batch Christmas cards) for my loss of mojo.
However, after my last post, I decided to set myself a challenge - to take my multiple stamped images that look oh so samey, and to use each one to create a card that was different from the last. Going well so far! Will share some pics later in the week.
Off for my late morning cuppa and choccy biccie (Remember people, biccies are for life, not just for missing mojo!!)
Thanks for stopping by
Debs x
I stamped the image several times (you can see the full stamped image in the next photo) and coloured with Pro Markers, then I set about cutting it into pieces and assembling into a 'cake' - I was quite pleased with the end result - something fun and a bit different.
This second card uses the whole stamp (Personal Impressions - from Hobbycraft) as a background frame for my birthday message. Again, I stamped it out a couple of times and cut out individual pieces to decoupage on the main pic. Added a DIY guy from another Personal Impressions set - Cute Characters 1 - and used a cut out saw to create a stop for my easel card. Background paper from Messy Rabbit cd again (great papers on there!)
My DH is always pottering in the garage, and in our house it's known as 'the man's room!' so thought this was quite appropriate!
Been a strange week in our house, brother in law took a turn for the worse, then rallied, still in ICU, but slight improvement. I had the lurgy - one of those strange ones where only one side of your nose is runny, and your head feels like it's full of soggy cotton wool, but to the outside world you appear 'normal' (well, as normal as I ever look lol!) - and I blame this (and my pathetic attempt at batch Christmas cards) for my loss of mojo.
However, after my last post, I decided to set myself a challenge - to take my multiple stamped images that look oh so samey, and to use each one to create a card that was different from the last. Going well so far! Will share some pics later in the week.
Off for my late morning cuppa and choccy biccie (Remember people, biccies are for life, not just for missing mojo!!)
Thanks for stopping by
Debs x
Wednesday, 23 November 2011
WOYWW 129 - and self inflicted mojo departure!
OK, so I normally love to make Christmas cards, I actually started in January this year (only cos I had a couple of free days when I was bored & still in the christmas spirit, so made a few in the first week!!)
Then pretty much nothing until I had to start making Christmas samples for publication, and that was in the summer! Made a bunch of sample cards and then forgot about my own Christmas cards, until this week, when I decided I really should get my act together. So I decided to get all clever and make a batch of snowmen cards. Aaaaaaaaaaaaaaaaargh!! I have discovered that batch making cards is a sure fire way to kill my crafty mojo!
As you can see from the pic above, my desk has a few snowmen, and I couldn't cope with them all being the same, so started changing the colours, and I stamped off a load of identical 'SNOW' letters, and cut them all out, made a couple of cards with the words on, and now I'm bored with looking at them!
So I am going to resort to my crafty inspiration - tea and chocolate digestives (and tonight's Pro Marker class!) And of course, taking a world-wide wander through other people's crafty inspiration over at Julia's WOYWW blog hop.
thanks for stopping by, and hopefully there will be something more fun to see next time you visit, and the crafty mojo will have reappeared courtesy of Mr McVitie's biscuits!
Deb x
Saturday, 19 November 2011
Spending dilemma and blog Candy!
So my very kind Hubby gave me a voucher to buy some goodies at the craft Barn, and when I went on line to spend, I found they have a great Blog Candy giveaway!
I don't know about you, but whenever I get gift vouchers I develop a form of 'purchase paralysis'. I want to buy something I wouldn't just go and buy myself anyway, as it's a gift, but then I end up spending hours (literally!!) roaming the websites trying to make up my mind how to spend my voucher.
Such a tough decision!
Not a lot of crafting going on today, spent time cleaning the house - it so needed it! I'm not a great fan of housework, and positively hate the vacuum (see Bubbles!, that's why you should come to me for your vacuuming fix!!) so our house tends to get what my Mum used to cal 'a lick and a promise' now and again, then a full scale battalion attack when people are coming to visit :-)
so, housework done, and Blog Candy posted, I'm off to spend another happy hour deciding how to spend my voucher
Debs x
I don't know about you, but whenever I get gift vouchers I develop a form of 'purchase paralysis'. I want to buy something I wouldn't just go and buy myself anyway, as it's a gift, but then I end up spending hours (literally!!) roaming the websites trying to make up my mind how to spend my voucher.
Such a tough decision!
Not a lot of crafting going on today, spent time cleaning the house - it so needed it! I'm not a great fan of housework, and positively hate the vacuum (see Bubbles!, that's why you should come to me for your vacuuming fix!!) so our house tends to get what my Mum used to cal 'a lick and a promise' now and again, then a full scale battalion attack when people are coming to visit :-)
so, housework done, and Blog Candy posted, I'm off to spend another happy hour deciding how to spend my voucher
Debs x
Friday, 18 November 2011
Fat and sugar free mincemeat (and it's delicious!)
For those who asked, here is my recipe for mincemeat. My family have now got to the point where they won't eat the shop bought varieties as they find them too sweet and greasy. A bit embasrrassing when you're out visiting!
This is an absolute doddle to make, and will keep in sterilised jars in the fridge for up to 4 months, and for a week once opened. But in our house, it all gets used the day it's made, makes about 6-7 dozen mince pies (depends how generous you are with the filling). We then eat any that broke apart (and some that 'got' broken!!) on the day, and the rest are frozen. If you're not bothered about the sugar, you can dredge with icing sugar once cooled, and I'm not too precise about the measurements any more, I just tend to go with what feels right. (I have been using the recipe for 20+ years, so it's almost second nature now lol!)
It has been known that all 7 dozen have gone before Christmas, and I've spent christmas eve frantically baking the same amount again, which duly disappeared by New Years!!
spicy fat-free mincemeat
1kg mixed dried fruit
600g cooking apples (about 3) peeled and grated (they will go brown, don't worry about it!)
2 tsp ground mixed spice, plus 1tsp ground cloves, 1 tsp ground cinnamon (or whatever mix of spices you prefer)
600 ml sweet cider (eg; Woodpecker)
50g chopped mixed nuts
100g chopped glace cherries
2tbsp brandy
1. Put dried fruit in large pan with apples, spices and cider. Simmer for about 20 mins until pulpy and nearly all liquid evaporated
2. Turn off heat, stir in nuts, cherries and brandy
That's it! Simple, delicious and smells AMAZING! Pop a large spoonful into each pastry case, pop in the oven for 15-20 mins and you're done.
Enjoy
Debs xxx
This is an absolute doddle to make, and will keep in sterilised jars in the fridge for up to 4 months, and for a week once opened. But in our house, it all gets used the day it's made, makes about 6-7 dozen mince pies (depends how generous you are with the filling). We then eat any that broke apart (and some that 'got' broken!!) on the day, and the rest are frozen. If you're not bothered about the sugar, you can dredge with icing sugar once cooled, and I'm not too precise about the measurements any more, I just tend to go with what feels right. (I have been using the recipe for 20+ years, so it's almost second nature now lol!)
It has been known that all 7 dozen have gone before Christmas, and I've spent christmas eve frantically baking the same amount again, which duly disappeared by New Years!!
spicy fat-free mincemeat
1kg mixed dried fruit
600g cooking apples (about 3) peeled and grated (they will go brown, don't worry about it!)
2 tsp ground mixed spice, plus 1tsp ground cloves, 1 tsp ground cinnamon (or whatever mix of spices you prefer)
600 ml sweet cider (eg; Woodpecker)
50g chopped mixed nuts
100g chopped glace cherries
2tbsp brandy
1. Put dried fruit in large pan with apples, spices and cider. Simmer for about 20 mins until pulpy and nearly all liquid evaporated
2. Turn off heat, stir in nuts, cherries and brandy
That's it! Simple, delicious and smells AMAZING! Pop a large spoonful into each pastry case, pop in the oven for 15-20 mins and you're done.
Enjoy
Debs xxx
Wednesday, 16 November 2011
WOYWW 128 - Christmas boxes
So I'm a bit slow with the WOYWW pic today, if you hop on over to Julia's blog at the Stamping Ground, you get to take a peek at lots of crafters creations - it's great fun but be warned - it's hugely addictive and can swallow a whole day if you're not careful!
I've spent the morning playing with templates for Christmas gift boxes ready for an upcoming class, and you can see a couple of them on my cutting mat, and another unfinished, with a red ribbon around it and a finished icicle box next to it. Lots of punches, some gems, some Pro Markers, a box of distress inks and the ever present baby wipes! And top right, a box of wires to try out with my new toy - a Zutter bind it All! I bought this on E-bay a week ago and didn't have any binding wires to try it out. Christmas calendars here we come!
I have some beautiful craft cd's, including the Joanna Sheen 'Ivory Cats' cd, and they have fab Calendars on them, so I'm looking forward to giving calendars to friends and family. Just have to think up ways of personalising them so they aren't just 'print and bind' pressies. Also need to find some of those big cardboard envelopes for calendars - if anyone knows where to get them, let me know!
Next I need to plan and organise my Christmas 'bake in'. My Christmas starts when I make the christmas puddings, mince pies and cake - and I'm a little late this year so need to get my act together. I started making my own Christmas puds about 20 years ago, making only one that first year from an old Family Circle recipe (anyone remember that??) which I still use - it doesn't even have metric measurements! Then family members asked 'are you making them this year?' and it grew from there. Now I make lots of them! They take about 6-7 hours steaming, the whole kitchen gets soggy, and while they are cooking I make the mince meat (sugar and fat free - so you can have twice as many lol!!) Then I bake the mince pies (8 dozen last year!)and I play Christmas music all day long, much to my husband's disgust!
I love this part of Christmas, the traditions and rituals that are my build up to the big day. Everyone is getting home made pressies this year, and I will be baking, cutting and sticking for a few weeks!
Happy blog-hopping everyone, and thanks for stopping by
Debs x
I've spent the morning playing with templates for Christmas gift boxes ready for an upcoming class, and you can see a couple of them on my cutting mat, and another unfinished, with a red ribbon around it and a finished icicle box next to it. Lots of punches, some gems, some Pro Markers, a box of distress inks and the ever present baby wipes! And top right, a box of wires to try out with my new toy - a Zutter bind it All! I bought this on E-bay a week ago and didn't have any binding wires to try it out. Christmas calendars here we come!
I have some beautiful craft cd's, including the Joanna Sheen 'Ivory Cats' cd, and they have fab Calendars on them, so I'm looking forward to giving calendars to friends and family. Just have to think up ways of personalising them so they aren't just 'print and bind' pressies. Also need to find some of those big cardboard envelopes for calendars - if anyone knows where to get them, let me know!
Next I need to plan and organise my Christmas 'bake in'. My Christmas starts when I make the christmas puddings, mince pies and cake - and I'm a little late this year so need to get my act together. I started making my own Christmas puds about 20 years ago, making only one that first year from an old Family Circle recipe (anyone remember that??) which I still use - it doesn't even have metric measurements! Then family members asked 'are you making them this year?' and it grew from there. Now I make lots of them! They take about 6-7 hours steaming, the whole kitchen gets soggy, and while they are cooking I make the mince meat (sugar and fat free - so you can have twice as many lol!!) Then I bake the mince pies (8 dozen last year!)and I play Christmas music all day long, much to my husband's disgust!
I love this part of Christmas, the traditions and rituals that are my build up to the big day. Everyone is getting home made pressies this year, and I will be baking, cutting and sticking for a few weeks!
Happy blog-hopping everyone, and thanks for stopping by
Debs x
Wednesday, 9 November 2011
WOYWW
So an early entry from me today for the international snoopathon that is over at Julia's where we get the weekly delight of being able to see what others are creating, and show our workdesks to the world! Mine is relatively tidy (for me!) cos you can still see the table top in places!
Centre stage is a wedding card I'm working on for an old student of mine, and to the left are a batch of stamped images and samples ready for this weekend's Pro Marker workshop, and my 2 fave daisy punches, which I use again and again. Above that a pack of core'dinations and some beautiful Cheery Lyn dies I bought at the NEC - if you haven't seen these take a look, they are gorgeous! I have used one on the top right of the wedding card.
Hiding at back left behind my caddy is a tea bag box waiting to be altered, flip top tea boxes are just right for recipe cards etc. and to the left of the table out of shot is a huge bag of loo roll inners ready for more loo roll mini albums and Christmas crackers!
Hope you're having a fab Wednesday, and enjoy blog hopping around the other desks out there
Deb x
Centre stage is a wedding card I'm working on for an old student of mine, and to the left are a batch of stamped images and samples ready for this weekend's Pro Marker workshop, and my 2 fave daisy punches, which I use again and again. Above that a pack of core'dinations and some beautiful Cheery Lyn dies I bought at the NEC - if you haven't seen these take a look, they are gorgeous! I have used one on the top right of the wedding card.
Hiding at back left behind my caddy is a tea bag box waiting to be altered, flip top tea boxes are just right for recipe cards etc. and to the left of the table out of shot is a huge bag of loo roll inners ready for more loo roll mini albums and Christmas crackers!
Hope you're having a fab Wednesday, and enjoy blog hopping around the other desks out there
Deb x
Tuesday, 8 November 2011
NEC visit, traffic jams and guilt!
If you read my earlier posts, you will know that I was not planning to go to the NEC, although I had some samples that were going to be on display. I had a freebie pass, but not a free day. Well, I had a last minute cancellation of a meeting on Friday morning, and had the whole day free, so thought to myself 'a-ha, serendipity! Off to the NEC for me!'
You would think that this would be a nice day out, free pass, goodies to drool over etc. I left home at 10.45, expecting to be there by 1.00 (usually 2 hours door to door) but actually parked up at the NEC at 3.30. Yep, nearly 5 hours in the car! Teeth gnashing and wailing to no avail, there was a crash on the M42 and they closed the road for the air ambulance - and when I heard this after nearly 2 hours sat in the jam, I immediately felt bad that some poor soul had been so badly injured and all I was doing was 'off on a jolly'. Then the 'it could have been me if I was half an hour earlier' syndrome kicked in, and then guilt that I could be so selfish. Then later that night when I saw the terrible crash on the M5, I was so grateful that all that had happened to me was a traffic jam.
So, had about an hour and a half to rush round the NEC, indluding a stop at the WOW embossing powders stand, where my DT samples were displayed and here are some pics of my creations...
(still gives me a thrill to see my creations on display or in print :-) Met some lovely people, didn't spend much (makes a change!) and got soaked in a torrential downpour - all in all a good day!
Thanks to the lovely people who have asked how Barney the kitty is doing, he's happy and healthy and the vet gave him a week off for good behaviour! Back to the vet next week for a check up when hopefully he'll get the all clear.
Thanks for stopping by
Debs x
You would think that this would be a nice day out, free pass, goodies to drool over etc. I left home at 10.45, expecting to be there by 1.00 (usually 2 hours door to door) but actually parked up at the NEC at 3.30. Yep, nearly 5 hours in the car! Teeth gnashing and wailing to no avail, there was a crash on the M42 and they closed the road for the air ambulance - and when I heard this after nearly 2 hours sat in the jam, I immediately felt bad that some poor soul had been so badly injured and all I was doing was 'off on a jolly'. Then the 'it could have been me if I was half an hour earlier' syndrome kicked in, and then guilt that I could be so selfish. Then later that night when I saw the terrible crash on the M5, I was so grateful that all that had happened to me was a traffic jam.
So, had about an hour and a half to rush round the NEC, indluding a stop at the WOW embossing powders stand, where my DT samples were displayed and here are some pics of my creations...
(still gives me a thrill to see my creations on display or in print :-) Met some lovely people, didn't spend much (makes a change!) and got soaked in a torrential downpour - all in all a good day!
Thanks to the lovely people who have asked how Barney the kitty is doing, he's happy and healthy and the vet gave him a week off for good behaviour! Back to the vet next week for a check up when hopefully he'll get the all clear.
Thanks for stopping by
Debs x
Wednesday, 2 November 2011
Kitty update and WOYWW
Thanks to everyone who asked after Barney the kitty over the last few days. He is home now on 'Mummy Watch' feeling rather sorry for himself, but I think pleased to be home judging by the limpet-like attachment to my lap! Not conducive to crafting!
One unfortunate side effect of his having been on an open catheter is the awful stink. Good job I love him. Let's just say every surface is covered in old towels to avoid contamination! Poor little guy is still on tons of meds and with daily vet check ups, but definitely on the mend, so I gave him a bit of a wash earlier today - not sure who got wetter - him or me!
So, crafting mojo seemed to have left the house with the Kitty, and I was forced to tidy my craft table -eeek!! found half finished projects I had set aside for later (erm.......forgot about) and that pesky quickie glue pen that disappeared suddenly, miraculously reappeared.
So here's a pic of the 'tidy' table - bet you can't tell, huh? the clue is in the visible table top, a rare sight around here lol lol!!
Am part way thru prep for tonight's class and the glitter is out in force :-) the little purple and lime zippy centre stage is my glitter storage bag, an old cosmetic case that is plastic lined and so doesn't let the glitter out unless I set it free!
Now I'm off to Julia's blog where she hosts the weekly sneaky peek at other crafty desks around the world, have fun desk hopping, and thanks for stopping by.
Deb x
One unfortunate side effect of his having been on an open catheter is the awful stink. Good job I love him. Let's just say every surface is covered in old towels to avoid contamination! Poor little guy is still on tons of meds and with daily vet check ups, but definitely on the mend, so I gave him a bit of a wash earlier today - not sure who got wetter - him or me!
So, crafting mojo seemed to have left the house with the Kitty, and I was forced to tidy my craft table -eeek!! found half finished projects I had set aside for later (erm.......forgot about) and that pesky quickie glue pen that disappeared suddenly, miraculously reappeared.
So here's a pic of the 'tidy' table - bet you can't tell, huh? the clue is in the visible table top, a rare sight around here lol lol!!
Am part way thru prep for tonight's class and the glitter is out in force :-) the little purple and lime zippy centre stage is my glitter storage bag, an old cosmetic case that is plastic lined and so doesn't let the glitter out unless I set it free!
Now I'm off to Julia's blog where she hosts the weekly sneaky peek at other crafty desks around the world, have fun desk hopping, and thanks for stopping by.
Deb x
Monday, 31 October 2011
Poor kitty :-(
Not much crafting going on in the Willis household at the mo. Poor kitty is still really sick, and has been at the pet hospital since Thurs. Thursday afternoon was awful, as I went to take him to the vet for his daily check up and couldn't wake him up - nearly had a heart attack on the spot. After 4 continuous days of vets visits they admitted him and found he had a blood clot in his bladder, poor thing. He is recovering now and I hope they will let him come home in next day or two.
Had a demo at Hobbycraft on Sunday, but that's pretty much been it for past few days - too busy going to and fro to vets, or worrying about my baby :-(
For those of you who asked about my samples at the NEC, I won't actually be going, but my samples should be on the WOW Embossing Powders stand.
Here's a pic of me setting up for my Hobbycraft heat embossing demo, and on the front left of the pic you will see a sneaky peek of the twin of a tissue box that should be on the stand at the NEC - that's if my parcel of samples arrives in time! With all the vet visits, and my poor brother in law in hospital, it's been a pretty stressful week, and the samples only made it to the post on Friday - fingers crossed they make it in time!!
Hope you are all having a good week, and to paraphrase Bruce Forsyth....."Keeeeeeep Crafting!"
Thanks for stopping by
Debs x
Had a demo at Hobbycraft on Sunday, but that's pretty much been it for past few days - too busy going to and fro to vets, or worrying about my baby :-(
For those of you who asked about my samples at the NEC, I won't actually be going, but my samples should be on the WOW Embossing Powders stand.
Here's a pic of me setting up for my Hobbycraft heat embossing demo, and on the front left of the pic you will see a sneaky peek of the twin of a tissue box that should be on the stand at the NEC - that's if my parcel of samples arrives in time! With all the vet visits, and my poor brother in law in hospital, it's been a pretty stressful week, and the samples only made it to the post on Friday - fingers crossed they make it in time!!
Hope you are all having a good week, and to paraphrase Bruce Forsyth....."Keeeeeeep Crafting!"
Thanks for stopping by
Debs x
Thursday, 27 October 2011
Shaving Foam Marbled paper
A few people have asked about the shaving foam technique, so I thought I would show you what we made last night and explain how.
This is the marbled paper we created -what's left of it! this one got torn while it was still damp.
I saw Ali Reeve demo this on C&C, and there are videos on u-tube if you take a look. It's very easy to do. Spray a layer of shaving foam (better than gel) in bottom of an A4 plastic box (or in a clean sink so you can wash it away after). Squirt a few sprays of ink onto the foam - I use Stamps Away Colour Mist, but you can use any re-inker or alcohol inks. the only thing that doesn't work well is something like Mica mists, as they are so diluted with water they just make the foam collapse.
Use the end of a paintbrush or pencil to make swirls in the inked foam, and when you are happy with the pattern, press a piece of paper or card gently onto the foam until the underside is covered with foam. Lay it face up on your craft mat and press a clean piece of paper on top of the foam covered side and you get 2 sheets - the first impression will always be darker than the second, but it's quite nice to create different depths of colour. Then you just wipe away the excess foam with kitchen roll, or if you're being really thrifty, use an old credit card to scrape off the foam and pop it back in the box. This sample only used a little ink, but you can use a lot and create quite a strong colour - it's fun to experiment!
These are some of the embellishments we made with our marbled card and paper, different flowers, feathers and a rosette (we ran out of time on the rosette cos we had so much fun getting messy with the foam lol lol!) Or you can use it as background paper, or to create an accent on a card with matting and layering.
And I just had to share with you a picture of my ladies from last night's class, we had 3 generations of one family there, isn't that lovely? We all had a great time, and got VERY mucky!
thanks for stopping by
Debs x
This is the marbled paper we created -what's left of it! this one got torn while it was still damp.
I saw Ali Reeve demo this on C&C, and there are videos on u-tube if you take a look. It's very easy to do. Spray a layer of shaving foam (better than gel) in bottom of an A4 plastic box (or in a clean sink so you can wash it away after). Squirt a few sprays of ink onto the foam - I use Stamps Away Colour Mist, but you can use any re-inker or alcohol inks. the only thing that doesn't work well is something like Mica mists, as they are so diluted with water they just make the foam collapse.
Use the end of a paintbrush or pencil to make swirls in the inked foam, and when you are happy with the pattern, press a piece of paper or card gently onto the foam until the underside is covered with foam. Lay it face up on your craft mat and press a clean piece of paper on top of the foam covered side and you get 2 sheets - the first impression will always be darker than the second, but it's quite nice to create different depths of colour. Then you just wipe away the excess foam with kitchen roll, or if you're being really thrifty, use an old credit card to scrape off the foam and pop it back in the box. This sample only used a little ink, but you can use a lot and create quite a strong colour - it's fun to experiment!
These are some of the embellishments we made with our marbled card and paper, different flowers, feathers and a rosette (we ran out of time on the rosette cos we had so much fun getting messy with the foam lol lol!) Or you can use it as background paper, or to create an accent on a card with matting and layering.
And I just had to share with you a picture of my ladies from last night's class, we had 3 generations of one family there, isn't that lovely? We all had a great time, and got VERY mucky!
thanks for stopping by
Debs x
Wednesday, 26 October 2011
WOYWW
So I've fallen a bit behind in the blogging world........last week I was away all week working, thought I would have loads of time for crafting and blogging in the evenings. What happened? WEach evening I returned to my hotel room exhausted and all I did was eat and sleep! All those lovely crafty bits stayed in my bag, no energy and no mojo!
then this week we have had a family emergency and a poorly kitty to look after around the clock. Have you ever seen a cat so drugged up he walks into walls and falls down? Bless him, now he's confined to the one room so he doesn't hurt himself
Anyhoo.......this is the pic of today's workdesk, with some strategically placed tissue paper to hide my DT projects that are headed off to the NEC next week! You can just see a sneaky peek to the left and right of the pink tissue paper.
Front and centre we have the most important project right now - a cuppa!!! In my favourite mug from Margaritaville. Front right are some masking experiments with shaving foam and spray inks, the key ingredients for tonights class!
I'm off to have a quick peek at a few more desks at Julia's before I head out for tonights class.
Happy desk hopping!
Deb x
then this week we have had a family emergency and a poorly kitty to look after around the clock. Have you ever seen a cat so drugged up he walks into walls and falls down? Bless him, now he's confined to the one room so he doesn't hurt himself
Anyhoo.......this is the pic of today's workdesk, with some strategically placed tissue paper to hide my DT projects that are headed off to the NEC next week! You can just see a sneaky peek to the left and right of the pink tissue paper.
Front and centre we have the most important project right now - a cuppa!!! In my favourite mug from Margaritaville. Front right are some masking experiments with shaving foam and spray inks, the key ingredients for tonights class!
I'm off to have a quick peek at a few more desks at Julia's before I head out for tonights class.
Happy desk hopping!
Deb x
Thursday, 13 October 2011
Hallloween card - who knew tearing paper could be so scary????
I just had to show you the Halloween card we made last night. The class had a ball making the card, learning how to 'flap' diamond top cards to get them to fold right, and adding scary pumpkins and bats!
This is the front of the card, complete with haunted house, witch, pumpkin, black cat and or course, those bats I spent ages punching out lol!!
The main image and wrap were torn rather than cut, to add to that grungy look, but some of the ladies in the class found tearing paper to be sacrilegous!!! It was so funny watching people trying to tear 'neatly' and some decided not to tear at all, and reverted to their scissors, using them to cut out the uneven 'torn looking' edge printed on the paper!
And as promised, this is the inside of the card, complete with 'flying' ghostie! We stuck 2 ghosties back to back, with some thread sandwiched between, and then poked a hole in the top of the card and threaded the ends thru so the ghostie 'floated' when the card was opened. We covered the ends of the thread on the back of the diamond with another pumpkin head.
This was so much fun to do, and would work equally well for a Christmas card, with hanging snowflakes, and one lady wants to use it as a nativity, because the diamond top looks like a roof - lots of inspiration there!
Thanks for stopping by
Debs x
This is the front of the card, complete with haunted house, witch, pumpkin, black cat and or course, those bats I spent ages punching out lol!!
The main image and wrap were torn rather than cut, to add to that grungy look, but some of the ladies in the class found tearing paper to be sacrilegous!!! It was so funny watching people trying to tear 'neatly' and some decided not to tear at all, and reverted to their scissors, using them to cut out the uneven 'torn looking' edge printed on the paper!
And as promised, this is the inside of the card, complete with 'flying' ghostie! We stuck 2 ghosties back to back, with some thread sandwiched between, and then poked a hole in the top of the card and threaded the ends thru so the ghostie 'floated' when the card was opened. We covered the ends of the thread on the back of the diamond with another pumpkin head.
This was so much fun to do, and would work equally well for a Christmas card, with hanging snowflakes, and one lady wants to use it as a nativity, because the diamond top looks like a roof - lots of inspiration there!
Thanks for stopping by
Debs x
Wednesday, 12 October 2011
WOYWW 123-Halloween and Flowers
So this is my work space this morning - if you're not sure why I'm posting a photo of my messy table, hop on over to Julia's blog where she hosts the biggest snoopathon!! You get to check out the craft desks and workspaces of other crafters. You get to see what other people are making, and feel better about your own messy (in my case) space! lol lol
Bottom left of pic are the kits I'm getting ready for tonight's class, and just above that you can see my Halloween punch - I've been punching out gazillions of little black bats - guess what tonight's project is?????????? Witches and bats pumpkins and flying (yes, flying!!) ghosties!!
Above the punch is an empty ice cream container - great size for craft storage, so I will just have to keep eating the ice cream! Also a part-finished DT project I'm working on - not quite coming together yet. Just to the right of centre are a few pink tissue paper carnations I've been experimenting with, I'm quite chuffed at how they turned out and they are a doddle to make, AND they squash flat to go in the post, and it just makes them look better! Will add them to a later post - thinking of dunking them in glitter to bling them up a bit!
On the far right is a bag of K&Co embellishments and a few packs of die cuts and rub on's. I've had a sort out and I'm trying to decide what to do with them, cos I don't think I'll use them.
Oh yeah, and in the front of the pic, the placemats from last night's dinner, which is, after all, only the secondary purpose of this table lol lol!!
Happy WOYWW everyone
Debs x
Bottom left of pic are the kits I'm getting ready for tonight's class, and just above that you can see my Halloween punch - I've been punching out gazillions of little black bats - guess what tonight's project is?????????? Witches and bats pumpkins and flying (yes, flying!!) ghosties!!
Above the punch is an empty ice cream container - great size for craft storage, so I will just have to keep eating the ice cream! Also a part-finished DT project I'm working on - not quite coming together yet. Just to the right of centre are a few pink tissue paper carnations I've been experimenting with, I'm quite chuffed at how they turned out and they are a doddle to make, AND they squash flat to go in the post, and it just makes them look better! Will add them to a later post - thinking of dunking them in glitter to bling them up a bit!
On the far right is a bag of K&Co embellishments and a few packs of die cuts and rub on's. I've had a sort out and I'm trying to decide what to do with them, cos I don't think I'll use them.
Oh yeah, and in the front of the pic, the placemats from last night's dinner, which is, after all, only the secondary purpose of this table lol lol!!
Happy WOYWW everyone
Debs x
Monday, 10 October 2011
Stampscapes, Ink Dusters and the Grand Prix!
I had a lovely afternoon yesterday whilst Hubby watched the Grand Prix - I spent hours with ink and paper and stamps! I mentioned in an earlier post that I had received some beautiful Stampscapes stamps for my birthday, and I had a ball playing with them. This was the first design with a brayered background using a Big n juicy ink pad and Funky Hands 'Funky Seasons' backing papers from the beautiful Winter Skating collection.
The second design was using Distress Inks and Inkylicious Ink Dusters (thanks to Shoshi for her U tube tutorial!) The background was lightly covered with Mustard Seed and Wild Honey and then stamped all over in Wild Honey and Walnut Stain, after stamping off the first generation of ink to give a very soft background.
The tag was inked with Mustard Seed, Wild Honey and Spiced Marmalade, and overstamped with Memento Tuxedo Black, then mounted on black mirri card. The fibres were added to give the card more texture, as it seemed a little flat.
I was really pleased with the INkylicious Ink Dusters - they give a beautiful soft finish and blend so easily. I did find that they take longer to achieve a result than Cut N Dry or the Tim Holtz blending tool, but the end results are much smoother.
Thanks for dropping by!
Deb x
The second design was using Distress Inks and Inkylicious Ink Dusters (thanks to Shoshi for her U tube tutorial!) The background was lightly covered with Mustard Seed and Wild Honey and then stamped all over in Wild Honey and Walnut Stain, after stamping off the first generation of ink to give a very soft background.
The tag was inked with Mustard Seed, Wild Honey and Spiced Marmalade, and overstamped with Memento Tuxedo Black, then mounted on black mirri card. The fibres were added to give the card more texture, as it seemed a little flat.
I was really pleased with the INkylicious Ink Dusters - they give a beautiful soft finish and blend so easily. I did find that they take longer to achieve a result than Cut N Dry or the Tim Holtz blending tool, but the end results are much smoother.
Thanks for dropping by!
Deb x
Friday, 7 October 2011
Missing the sunshine :-(
OK, I know it was unseasonal weather last weekend, and everyone's probably heard enough about it already but........I miss the sun! Sat here with grey clouds and cold feet (must put slippers on lol).
I wanted to share just one last pic from the hot weekend - my Barney - big fat ginger cat. He got so hot outside, he had to come inside for a lie down in the shade, and decided he needed to cool as much of himself as possible as fast as possible lol lol!!
It's been a busy work week, so not much crafting. I have to make a wedding card (it's tomorrow - eek!!) and I have some new stamps to play with, so I need to get organised.
Debs x
I wanted to share just one last pic from the hot weekend - my Barney - big fat ginger cat. He got so hot outside, he had to come inside for a lie down in the shade, and decided he needed to cool as much of himself as possible as fast as possible lol lol!!
It's been a busy work week, so not much crafting. I have to make a wedding card (it's tomorrow - eek!!) and I have some new stamps to play with, so I need to get organised.
Debs x
Wednesday, 5 October 2011
WOW - a clean workspace (aka the dining room table!)
I just had to share this pic today, cos it's not often you can actually SEE that this is a table!! Being a follower of WOWYY with Julia at Stamping Ground I wanted to show you that today, dear blog hopper, I have a clear table. It's a sad day when there's no crafting :-(
Think I'd better mess this table up soon to make myself feel better :-)
So I thought I would show you what I was doing during our mini heatwave last weekend, when Hubby was out slaving in the garden............... and I was working hard on my next project for Making Cards! This is MUCH more normal - you can see how my Crafter's Spread has....ahem....spread...to the chair, the floor and even the kitchen!
This proved to be a bit of a challenge when I needed to stop and make sarnies - nowhere was clear! So being a good crafter I improvised and moved the kettle to the floor so that I had space to make lunch - well, I couldn't move my Cuttlebug - I still needed it!!!
Thanks for stopping by
Debs x
Think I'd better mess this table up soon to make myself feel better :-)
So I thought I would show you what I was doing during our mini heatwave last weekend, when Hubby was out slaving in the garden............... and I was working hard on my next project for Making Cards! This is MUCH more normal - you can see how my Crafter's Spread has....ahem....spread...to the chair, the floor and even the kitchen!
This proved to be a bit of a challenge when I needed to stop and make sarnies - nowhere was clear! So being a good crafter I improvised and moved the kettle to the floor so that I had space to make lunch - well, I couldn't move my Cuttlebug - I still needed it!!!
Thanks for stopping by
Debs x
Monday, 3 October 2011
CF Weds Class - Using Decoupage Twisters
We cut the front of the card on the diagonal and fixed the main image to mirri then on the inside face of the card so it showed over the diagonal (if your decoupage is not square, you could just mount it on a square of mirri or toning card). Front & inside of card was covered in toning paper, and we reserved the smallest layer of decoupage & cut an aperture lower right front to fit - the little swan looks great peeping through the aperture!
On the front of the card are a tag and border from the decoupage sheet, layered onto mirri, and a couple of vellum butterflies (glittered, of course!!) and the rest of the decoupage layers. Added some card candi on the inside of the card to finish it off and balance it out - we were quite pleased with our finished design!
Debs x
Tuesday, 27 September 2011
Birthday surprises!
It was Hubby's birthday this weekend, so I made cards from me and the cat (of course!!) Can you tell what his hobby is from the cards????????????? I've kept them simple and entered them in the Challenge at Allsorts
This one is a twisted stacker matted and layered on red card and silver mirri. The fabulous rubber tyre embellishment was a gift from a friend in the States, and I've just been itching to use it!
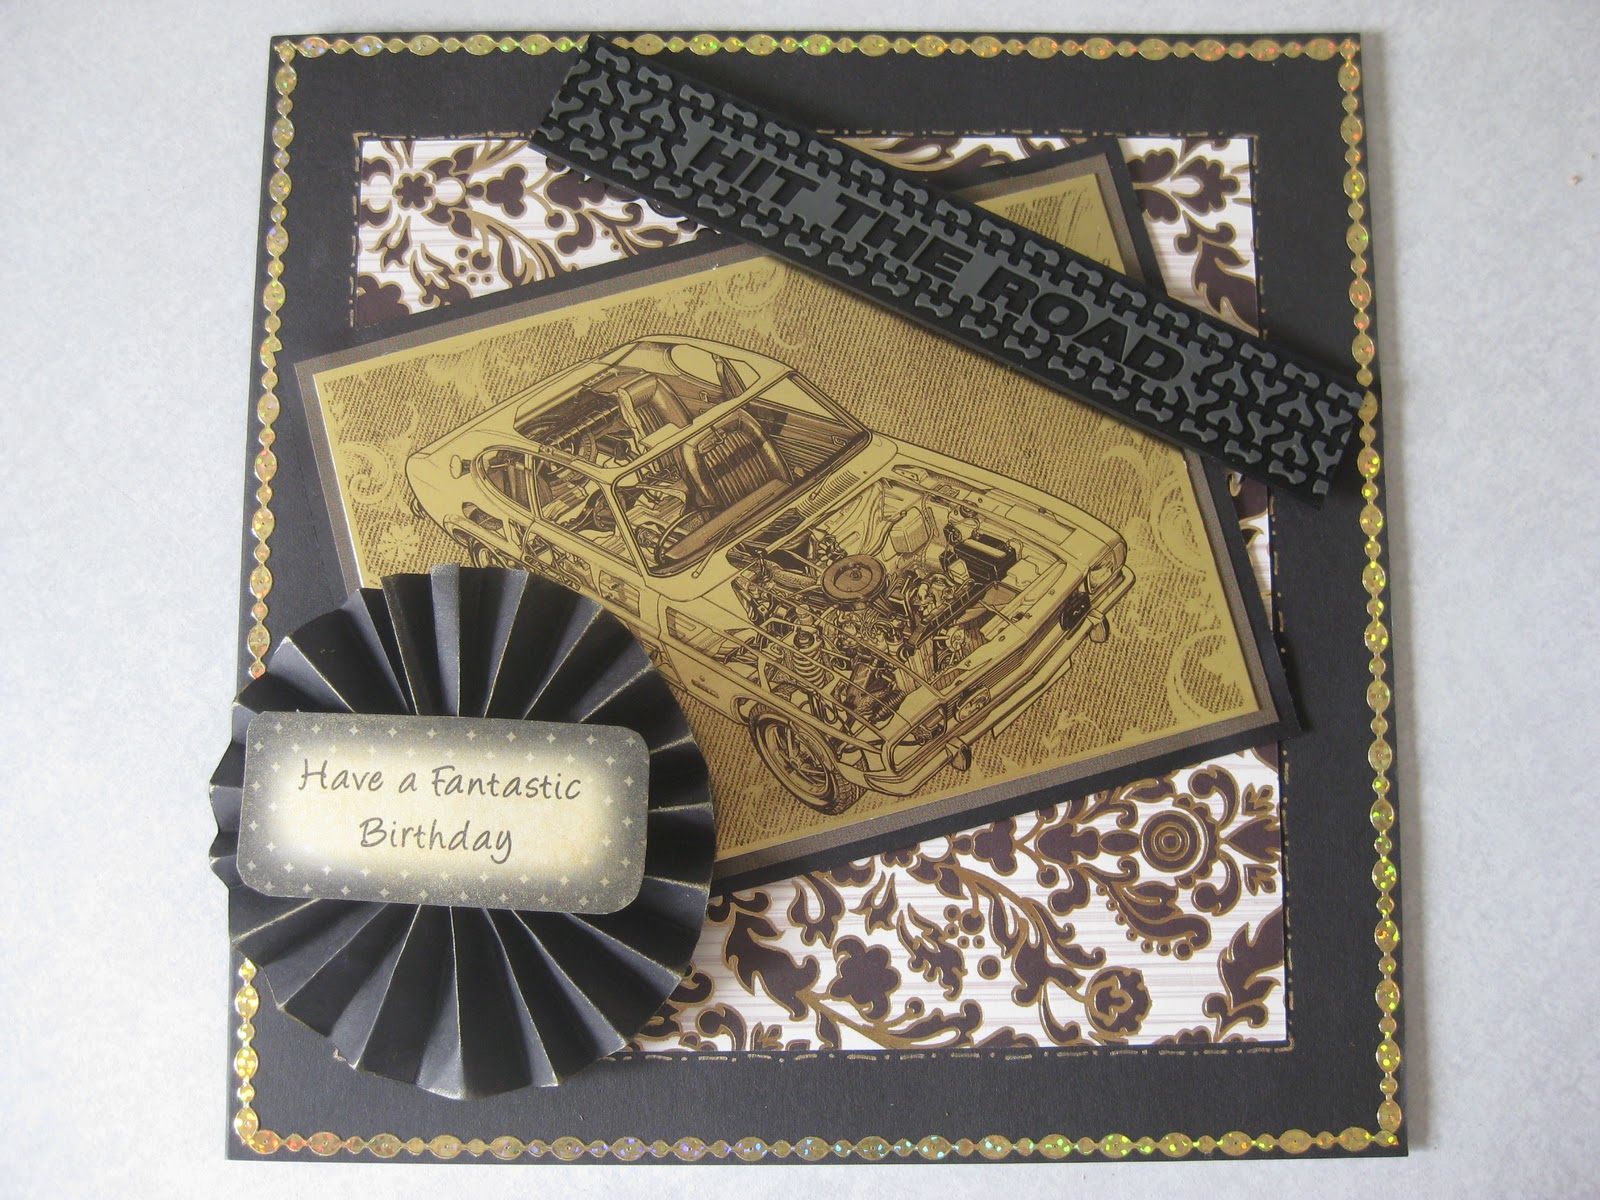
This black and gold creation was inspired by a Kanban topper I found at a show, based on an illustration from a Haynes Motor Manual - the car is a Capri, one of Hubby's earlier cars! Again, the rubber 'Hit the Road' embellishment was part of the stash from my friend Donna (thanks D!!!)
So on to the birthday surprise........
I wanted to do something different for Andy's birthday, and he loves American Muscle cars (he graduated from the Capri many years ago lol lol) He currently owns a Thunderbird which he uses every day, and until recently had a Firebird (think Knight Rider, if you're old enough to remember, but in white!) So I found this fantastic company that hires out classic American muscle cars by the day! He's always lusted after a 1965 Mustang convertible, and you guessed it, they had one!!!
This is Andy standing next to the Mustang at the start of our day. We were very lucky and had a dry day, so we were able to put the top down for the day - got a bit chilly when the sun went in!! I also found out that wearing lip gloss when you're hair is being whipped about in the wind is NOT a good idea - sticky hair and constantly peeling it off my lips - eeuk!!
We spent the day driving around Dorset and Somerset, down the coast to Lyme Regis (which was packed - did everybody take the day off yesterday and not tell me??). We met and overcame a range of obstacles on our quest for the perfect drive - ambulances flying out in front of us, learner drivers on single country lanes, lunatics racing on quad bikes, unexpected road closures and we finished up at a fantastic country pub in the middle of nowhere, where we ate ourselves stupid! Yummy!
Just about managed to stay awake for the long drive home, and fell into bed with a wind-burned face and hair tangled like I'd been through the proverbial hedge backwards, frontwards and sideways! These movie stars who wore scarves when riding in convertibles knew a thing or two!
It was a great day out, and think Hubby was suitably surprised :-0
bye for now
Debs xx
This one is a twisted stacker matted and layered on red card and silver mirri. The fabulous rubber tyre embellishment was a gift from a friend in the States, and I've just been itching to use it!
This black and gold creation was inspired by a Kanban topper I found at a show, based on an illustration from a Haynes Motor Manual - the car is a Capri, one of Hubby's earlier cars! Again, the rubber 'Hit the Road' embellishment was part of the stash from my friend Donna (thanks D!!!)
So on to the birthday surprise........
I wanted to do something different for Andy's birthday, and he loves American Muscle cars (he graduated from the Capri many years ago lol lol) He currently owns a Thunderbird which he uses every day, and until recently had a Firebird (think Knight Rider, if you're old enough to remember, but in white!) So I found this fantastic company that hires out classic American muscle cars by the day! He's always lusted after a 1965 Mustang convertible, and you guessed it, they had one!!!
This is Andy standing next to the Mustang at the start of our day. We were very lucky and had a dry day, so we were able to put the top down for the day - got a bit chilly when the sun went in!! I also found out that wearing lip gloss when you're hair is being whipped about in the wind is NOT a good idea - sticky hair and constantly peeling it off my lips - eeuk!!
We spent the day driving around Dorset and Somerset, down the coast to Lyme Regis (which was packed - did everybody take the day off yesterday and not tell me??). We met and overcame a range of obstacles on our quest for the perfect drive - ambulances flying out in front of us, learner drivers on single country lanes, lunatics racing on quad bikes, unexpected road closures and we finished up at a fantastic country pub in the middle of nowhere, where we ate ourselves stupid! Yummy!
Just about managed to stay awake for the long drive home, and fell into bed with a wind-burned face and hair tangled like I'd been through the proverbial hedge backwards, frontwards and sideways! These movie stars who wore scarves when riding in convertibles knew a thing or two!
It was a great day out, and think Hubby was suitably surprised :-0
bye for now
Debs xx
Wednesday, 21 September 2011
'Crafters Spread!' and WOYWW
My workdesk is looking messy - there's a surprise! You've heard of middle-aged spread - well I suffer from 'Crafter's spread'! The natural law that says she (or he) who crafts will expand stash and workings to fill all available space - desk, table, floor, chair - you name it!pop on over to Sarah's blog to see more WOYWW pics of crafters desks tidy and not so much!!
Front and centre is a rosette that didn't quite work out, mainly cos I was too lazy to score before I pleated so the concertina layers got slightly bigger each time, so one side is ok, and the pleats get fatter as you go round the rosette LOL :-)
Top left of the picture are some brayered backrounds waiting to be stamped, and then centre left are some samples using my lovely new Stampscapes stamps. Hubby bought these for my birthday and they are gorgeous! I have been playing with both brayering and using dusting brushes for the backgrounds and I was reallly pleased with the effects using duster brushes - much easier to control than the brayer - my brayering needs a little work! I am really pleased with the blue moonlit scene - love the colours. Will keep playing with those and will post some more pics soon.
Thanks for dropping by
Debs
Front and centre is a rosette that didn't quite work out, mainly cos I was too lazy to score before I pleated so the concertina layers got slightly bigger each time, so one side is ok, and the pleats get fatter as you go round the rosette LOL :-)
Top left of the picture are some brayered backrounds waiting to be stamped, and then centre left are some samples using my lovely new Stampscapes stamps. Hubby bought these for my birthday and they are gorgeous! I have been playing with both brayering and using dusting brushes for the backgrounds and I was reallly pleased with the effects using duster brushes - much easier to control than the brayer - my brayering needs a little work! I am really pleased with the blue moonlit scene - love the colours. Will keep playing with those and will post some more pics soon.
Thanks for dropping by
Debs
Subscribe to:
Posts (Atom)