Pages

Tuesday, 22 July 2014

Men's cards


I found this great stamp set at Newbury, from a company new to me 'Acid Drops & Whatnots'

They specialise in stamps & decoupage with a witty, humorous twist - great for those tricky men's cards! 

This one is made with snippets from LOTV 'Country Gentleman' pad & HOTP 'Red Velvet', plus a bunch of black snippets for the die cut back layers ( I have a HUGE folder each of black & white snippets!)

My checks & stripes didn't quite meet in the middle on my A5 card blank, so I had to get creative with a long skinny snippet to join them up!

Shamelessly copied from the stamp co's samples on display at Newbury! Added red card candi to finish it off

Linking this one to Pixies Snippets Playground - off to climb the treehouse! 

Thanks for stopping by

Debs x

Monday, 21 July 2014

Chocoholic birthday card


This one was made last weekend for Anna, my sisters partner. She's studying hard for her accountancy exams, and there seems to be a lot of coffee & chocolate involved!

The stamp is one of the Gruffies range from House Mouse, stamped & coloured with Pro Markers. The sentiment was hand written with a Sakura Gelly Roll glitter pen

The die cut layers, flowers & flourishes are all from snippets of the Hot Diggity Dog range (think its Papermania) that came out last year. 

Hope she likes it :-)

Going to link this to Pixies Snippets Playground, hop on over and see what the other playmates have created. 

Thanks for stopping by

Debs x

Sunday, 20 July 2014

Stencilling


These 3 were made from panels created in a stencilling class I ran a few months ago. They've been sat in a drawer waiting for me to decide what to do with them!


And then at Newbury Art Stamps I bought this perfect set of Lili of The ValleyEveryday  Sentiments. I've been looking for a set of handwritten script type sentiments for ages & these were ideal - lots if ideas bumping around in my head for using these!!

So these 3 came together very quickly. They were originally stencilled using a mix of Glitzcraft & That Special Touch masks by Stamps Away. 

Top one,( bluebells I think, but could be snowdrops too!) is straight inked, mounted on a piece of toning card, then on a lilac card blank. 

The fuschias & dandelion clocks were inked, then Stickles added thru the mask.   For both I stencilled the card blank in a continuation of the main panel. Quite like the effect of stencilling on hammered card blank for the fuschias!

 The dandelions were mounted on a leftover piece of multicoloured glitter card that's been getting dog eared in my snippets box since the year dot. It was so dog eared I had to trim it severely, then found the stencilled panel was a bit big so had to trim that back too!! 

My snippets box is a big Really Useful storage box with hanging A4 files, snippets divided into colour sections, some sub divided with both plain & pattern sections!! And any leftovers go in there, so some quote small, ranging up to big chunks left from A4 or 12x12 being cut up. 

The only snippets that don't go in here are those taken from a paper pad - these go into an acetate bag and are stored inside front cover of the paper pad so they are always with the matching set. 

So am I completely OCD about my snippets?? How do you store yours? 

Off to the snippets playground to ask the playmates!

Thanks for stopping by

Debs x


Sunday, 13 July 2014

Crafty displays

I've had a lovely day today playing with some of my new goodies bought at Newbury last weekend :-). Once I've sorted out the pics I'll upload some of the projects. Edit: note to self: never, ever, EVER try to use embossing powder when you have the fan on!! I will say no more!

In the meantime, thought I'd share with you how I display some of my current favourites in my craft room.....

This is a twisted wire heart wall hanging, it's about 18" wide and maybe a little taller. It has lots of little hearts dotted all over that can either hold cards, or can be used for hanging bits from, like my heart hangers dangling from the bottom!

I bought this at a craft market a few months ago and I absolutely love it! It's on the wall to the right of my desk, and I can look at some of my faves, old & new, & rearrange whenever I feel like it :-) best part, only cost £10!!

Until my hubby insisted I buy this (thanks Andy xxx) my creations were all tucked away in boxes. Now I can enjoy them all the time!

Hope you've had a lovely weekend, whatever you've been doing

Thanks for stopping by

Debs x


Saturday, 12 July 2014

Makeover!

Do you ever put cards together, then look at them and think 'that's not quite right?'

That's what happened with this one ....

I made it from leftover bits from a project last month. When you print the House Mouse design sheet you get a lot of extras, too many for one card, so I used a leftover small image & greeting to make this dinky A6 card, with a snippet of lilac card from the earlier project. 

But I didn't like the finished effect, so put it aside. When I woke up this morning at the crack of you must be joking, I was wide awake with nowt to do but stare at the ceiling. So......


I changed the colour of the card candi, added a few paper flowers from my oldest stash (got the most ginormous bag of these die cut flowers when I started crafting and still have hundreds left!). Then I added an ickle bit of Stickles glitter glue to the ends of the knitting needles & the small flowers (probably doesn't show up in pic)

Et voila!! A card I'm happy with, to pop in my basket for whenever I need it. 

Off to link this to Pixies Snippets Playground, think I might have to climb over the gate (watch out for the stinging nettles!) if Miss has locked up!! (If you have no idea what I'm blathering on about click here!)

Whilst I was in my craft room I also stamped off some cute images to colour, so off to catch up on this week's Create & Craft that I've recorded, with my stamped images & my Pro Markers!

Thanks for stopping by

Debs x


Friday, 11 July 2014

Variation on a theme!

Not much crafting done here this week. Very busy with work, 2 craft classes, housework (yes, really!!) and Osteo visit. So this weeks makes were quickies while watching last weeks British GP...,


If they look familiar that's cos I took last weeks Christmas snippets idea, changed the embossing folder to a 'Happy Birthday' one & off I went! Finished off nicely with some Craftwork Cards sentiments bought 4 sheets at Newbury for £1!!

Off to visit the snippets playground to see what everyone's been up to

Thanks for stopping by

Debs x

Sunday, 29 June 2014

BBQ and Christmas!

Today was our company BBQ and we were so lucky with the weather! Yesterday it hammered down with rain but today was lovely, warm & sunny.

Lots of yummy food and good company, and a rounders match that I cheered on mightily from the comfort of my garden chair lol!! 

So yesterday was yukky weather, it meant guilt free time in the craft room! I wanted to challenge myself to use up some of my oldest, gaudy sparkly snippets to make some Christmas cards. 

So I stamped lots of pressies, cut them out and mounted them on the snowy embossed card that the lovely Bonnie sent me. But I was mean and cut each embossed piece in half so I had more left! Then I mounted on offcuts of mirri card, some gold & some silver. 

I don't normally batch-make cards, but I ended up with 8, each a little different...


So this means that I can link to both pixies snippets playground, and Sarn's Rudolph challenge!

Then it occurred to me that the same design (minus snowy background) would work quite well for birthdays, so I see more stamping & snipping in the near future!! This colour way would work for birthdays, don't you think??

Anyway, off to soak up more sun! Thanks for stopping by

Debs x


Saturday, 28 June 2014

Lovely day out


Had a really fun day yesterday meeting up with some crafty friends from blog land. From L to R we have: Sam (Hettie), Di (Pixies Snippets), me, and Sarn (Stamping for Pleasure)

We all met up in my home town of Southampton so I did taxi service for Sam (Hettie) & Sarn who travelled from Wales (!) & West Sussex (that's dedication for you!) then we met up with Di for a very nice lunch. 

Lots of giggles, some lovely gifts exchanged, hints & tips flying across the table, a mini tutorial from Di on bows & charms, and lots of yummy food :-)

It was a lovely day, and there are plans afoot for a repeat performance, next time with a visit to a duck pond :-)

Debs x

Sunday, 22 June 2014

Pop up flower boxes and Hobbycraft demo

I'm off to Southampton Hobbycraft this afternoon to demo pop up flower boxes....


Bad planning as it looks like its going to be a scorcher today! 

These boxes are deceptively easy to make and I will be showing how to decorate them for different occasions. 

Step by step:

Lay A4 card landscape position, 
mark horizontal line across centre of card at 10.5cm from lower edge. 
mark vertical lines at 7, 14, 21 & 28 cm. 
Score across horizontal centre line from left edge across to 21cm vertical line (across 3 panels but leave 4th unscored - this 4th panel will be stand up back panel)
Score all lower vertical lines up to centre line, cut upper vertical lines above centre line to top edge. 
At 28cm line, cut away small panel above centre horizontal line, and on lower small panel cut a diagonal line from centre horizontal line to outer right edge approx 1.5cm down from centre line to create flap. 
Fold along all creases & fix flap to inside of box with strong glue or tape. Fold flaps out
Cut 2 - 3 strips of card 2cn x 10cm. Mark on the long edge at 1.5cm & 8.5cm & score on these lines, folding the 2 end flaps in opposite directions to create a 'Z' shape. Fix these strips inside the top edge of the box, just below the upper edge, a few cm apart. 
Cut small strips of acetate, fix upright to the cross pieces at different heights & fix embellishment to acetate strips 
 
Decorative paper panels are 6.5 cm x 9cm

Enjoy!
 
Debs x

Friday, 20 June 2014

Simple stories scrapbook

Warning - photo heavy post!!

I recently saw the Simple Stories 8x8 scrapbooks on special offer on C&C. I've seen the Project Life version, which was MUCH more expensive. I've never been quite sure about the 'slot it in' scrapbook style - my scrapbook pages tend to have quite a few embellishments!

Anyhoo, the deciding factor for me was that they had a version for a cat album, so I bought it. I have been having a blast completing my album, so I though I'd show it off!


You buy the basic album with page protectors, you get a mix of different styles, plus some co-ordinating patterned pages. 


The great thing is that you can still play and add your own touches! The page above I took a leftover piece of orange spotty 12x12 and made a flip page. I've also used lots of snippets for embellishments & small pocket inserts. 


You get a lot of fun inserts and embellishments with the kit, and I haven't used them all as there were tons! They are great fun and really add to the finished effect. 

Also a great opportunity to use up lots of snippets as some of the pockets are so diddy! So I'm linking to Pixies playground and I'll try to get round to see more of the playmates later :-)

So, has anyone else ventured into the Simple Stories kits? I would love to see what others have done. 

Thank for stopping by

Debs x


Monday, 16 June 2014

Another baby card!

So excited! Am off to the O2 arena to see  The Eagles! One of my fave bands - think I'm a rock- chick at heart lol! Have seen them play live lots of times and they're always great - cant wait :-)

Another baby card from me. Must have been something in the water 9 months ago cos there are SO many people having babies right now!

I just love these stamps from Crafters Companion, they are so cute, and lovely to colour 


I was really pleased with the colour scheme, as I wanted less traditional colours and this one worked out really well. Papers are all LOTV Nitwit Collection 'Promises'. I used a whole sheet to cover the card and then loads of snippets for die cuts and flourishes etc. 

The die cuts are Spellbinders, Labels 4 & Elegant Labels4, with the backing layer being Curved Rectangles - I use this one a lot as its a really good size!!

A Martha Stewart punch for the border, and a LOTV sentiment & some flourishes flowers & card candi to finish. 

Hopping over to Pixies Snippets Playground to check out what other crafty playmates have been up to. 

Thanks for stopping by

Debs x 

Tuesday, 10 June 2014

Double zig zag card

I've been wanting to try this one for a while, and finally got around to teaching it at today's class!


There is quite a lot of measuring, but the card is fairly straightforward to make. The hardest thing is slotting it all together!!

I was really pleased with the finished card, and my lovely ladies really enjoyed making it, so hopefully tomorrow nights class will enjoy it just as much!!

I was able to use lots I snippets for these projects. I spent ages sorting thru my snippets box to put colour schemes together, and we used lots of different punches and dies to decorate, so I'm linking this to pixies snippets playground. 

Also linking to Mrs A's Butterfly Challenge, which I've only just found via Pixies blog!


Thanks for stopping by

Debs x

Saturday, 7 June 2014

Pop up squash card

This was the project for my last class, and it was great fun to make and surprisingly easy!


The outside looks like a regular gatefold card, but when you open it there's a pop up surprise ....


I saw this Demo'd on a CraftworkCards show on C&C. They were selling it in ready made kit form, so I went away & played until I created my own version :-)

This folds flat to go in an envelope, something I've paid more attention to for recent classes! And it uses less than half a sheet of 12x12 plus some toning snippets from my stash, and flowers punched from snippets, so I'm linking this to Pixies Snippets Playground

Thanks for stopping by

Debs


Friday, 30 May 2014

Knitters birthday

Today is my Mother in Law's birthday, and she loves to knit, so this image seemed perfect for her card.

The house mouse images were very kindly given to me by a friend, Kim. I've added a backing layer cut from a leftover piece of lilac card using a spellbinders die - regal rectangles?

The ribbon was a couple of scraps from my ribbon box. I didn't have a big enough piece to go all the way across the card so had to use 2 pieces & cover the join with a Lili of The valley birthday greeting!

Then i used lots of snippets to cut flowers with Tim Holtz tattered florals die ( definitely a desert island must have!) and flower punches. Finished with lots of lilac gems. 

Linking this to pixies snippets playground cos I used lots of snippets :-)

Thanks for stopping by 

Debs x

Tuesday, 27 May 2014

Spring is in the air!

Gosh, it's been ages since my last post! Been very busy with work, classes & making lots of new baby cards! Spring is in the air & all the babies are arriving at once!

This card was made for a work colleague - love the colours in this. 


The image is Penny Black, from a wooden stamp belonging to a friend. It
was stamped on a scrap of card when round her house for a crafty evening & sat in a box for ages, and now I love it and will have to buy my own! Linking this to Penny Black Saturday Challenge

The papers are First Edition & I managed to use up lots of snippets for flowers, flourishes & mini die cuts. That's why I'm linking this to Pixies Snippets Playground. 

Off to make Mother in Laws birthday card :-)

Thanks for stopping by

Debs x

Friday, 21 March 2014

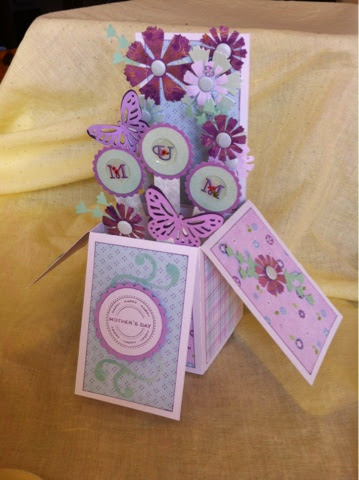
Flap box for Mother's Day


I saw these on Create & Craft last week, they were selling pre-cut kits so I decided to work it out for myself! They're actually far easier than they look & I was thrilled with the end result :-)

The box folds flat & fits into a C5 envelope for posting - perfect!

The basic box is really quick to assemble - its the decoration that takes a while! I used lots of snippets from the Nitwits Collection 'Promises. 8x8 paper pad & my snippets box, a couple of punches & die cuts & some card candi  to finish. I enjoyed making it so much, I made a second, more sophisticated version using Craftwork Cards Vogue Collection papers......


I'm linking this to Pixies crafty playground, since I used so many snippets, and I haven't visited for a while, so might need to sneak quietly through the gate and hide behind the roundabout!

EDIT:
Basic instructions:
Lay A4 card landscape position, mark vertical lines at 7, 14, 21 & 28 cm.  mark horizontal line across centre of card at 10.5cm from lower edge. 
Score across horizontal centre line from left edge across to 21cm vertical line (across 3 panels but leave 4th unescorted - this 4th panel will be stand up back panel)
Score all lower vertical lines up to centre line, cut upper vertical lines above centre line to top edge. 
At 28cm line, cut away small panel above centre horizontal line, and onlower small panel cut a diagonal line from centre horizontal line to outer right edge approx 1.5cm down to create flap. 
Fold along all creases & fix flap to inside of box with strong glue or tape. 
Cut 2 strips of card 2cn x 10cm. Mark on the long edge at 1.5cm & 8.5cm & score on these lines, folding the 2 end flaps in opposite directions to create a 'Z' shape. Fix these strips inside the top edge of the box, just below the upper edge, a few cm apart. 
Cut small strips of acetate, fix upright to the cross pieces at different heights & fix embellishment to acetate strips 

Enjoy!


Thursday, 20 March 2014

Stencilling

This is my new favourite technique since I taught it at a class last week. The ladies had so much fun learning the techniques & were thrilled with their finished artwork. So I wanted to show them what they can do with the stencilled panels they created, and a bit of matting & layering......


The main panel was coloured using duster brushes, then stencilled and glittered. The panel was matted & layered on contrasting papers and then I added a handmade tea bag folded butterfly in the same paper, with a beaded body. 

And these are some of the samples I made for the class....


You can see the in mounted panel lower left in the pic. 

Looking forward to seeing what others create with their panels!

Thank for stopping by

Debs 


Tuesday, 18 February 2014

Surfing & sunshine

How I wish for some lovely sunshine! We had a brief respite on Sunday here in the south, with a lovely clear sunny day, but then straight back to rain & gloom :-(

Anyhoo - this card was made for a friend who likes nothing better than taking her camper van out so her sons can surf & kayak - and she has a doggy too - perfect!


This was a very simple card made using snippets leftover from LOTV Country Gent & First Edition New Leaf pads, plus a decoupaged topper from the lovely Hot Diggity Dog Papermania collection. It was a big hit!

Linking this to Pixies Snippet Playground as I used.....snippets :-)

Thanks for stopping by

Debs x

Saturday, 8 February 2014

Karaoke card

Couldn't sleep so was in the craft room at 7 this morning making this card for a male friend who loves karaoke. Bit hard to photograph under my table lamp!


Men's cards can be a real challenge, but this one came together really quickly :-)

At a craft fair ages ago I bought some die cut toppers which were seconds, because the silver foiling had been cut off one edge of the sheet. The headphones Image in the centre was one of these, think I managed to disguise it quite well!

Background is stamped, 3 black panels embossed, dusted with mica & mounted on mirri - all from my snippets box - was finally able to use the sheet of mirri with a big crack in it. Then the die cuts & a few card candi to finish. 

Linking this to Pixies Snippets Playground & will hopefully manage to visit more playground pals than last week!

Thanks for stopping by

Debs x

Saturday, 1 February 2014

Grandpa card

I was asked recently to make something for a Grandpa, not too fussy, and when I asked about what he likes to do the answer was 'not a lot!' Lol :-). So I decided this cute little guy would fit the bill!


The striped background is an offcuts of a 12x12 sheet, and the border at the bottom was rescued from another project that was destined for the bin! He is stamped on a snippet of watercolour card and painted with distress Inks.

It's been a bit gloomy here lately, but today I see (drum roll please) SUNSHINE!! Ta da! May have to leave the craft projects & get out there. Maybe not quite dancing around the garden cos its still pretty soggy, but a lovely walk would be nice :-)

As I used lots of snippets for this one I'm linking to Pixies Snippets Playground - haven't visited for a while cos crafting has not been happening at the Willis house. Must try harder!

Have a lovely weekend everyone, & thanks for stopping by

Debs x